

You can make a pipe cleaner gingerbread man by building a simple brown chenille-stem frame, wrapping the body until it feels firm, and adding white “icing,” a bow tie, buttons, and a hanging loop. The project uses twists and wraps instead of hot glue, so the finished figure stays lightweight, poseable, and easy to turn into a Christmas ornament.
This tutorial explains one sturdy method that gives the gingerbread figure two even arms, two balanced legs, and enough structure to hold its shape. You can keep the decoration minimal for a classroom activity or add a detailed icing pattern for a handmade ornament. Because pipe cleaners contain wire, fold every cut end inward and supervise children according to their age and experience.
What You Need
- 5 to 7 brown pipe cleaners for the frame and wrapped body
- 1 white pipe cleaner for icing details
- 1 red pipe cleaner for a bow tie, scarf, or buttons
- 1 green pipe cleaner for buttons or a small holly accent
- A small piece of black pipe cleaner for eyes, if desired
- A short piece of ribbon, cord, or a pipe cleaner for the hanging loop
- Scissors for cutting short decorative pieces
- A pencil or marker for shaping small, even coils
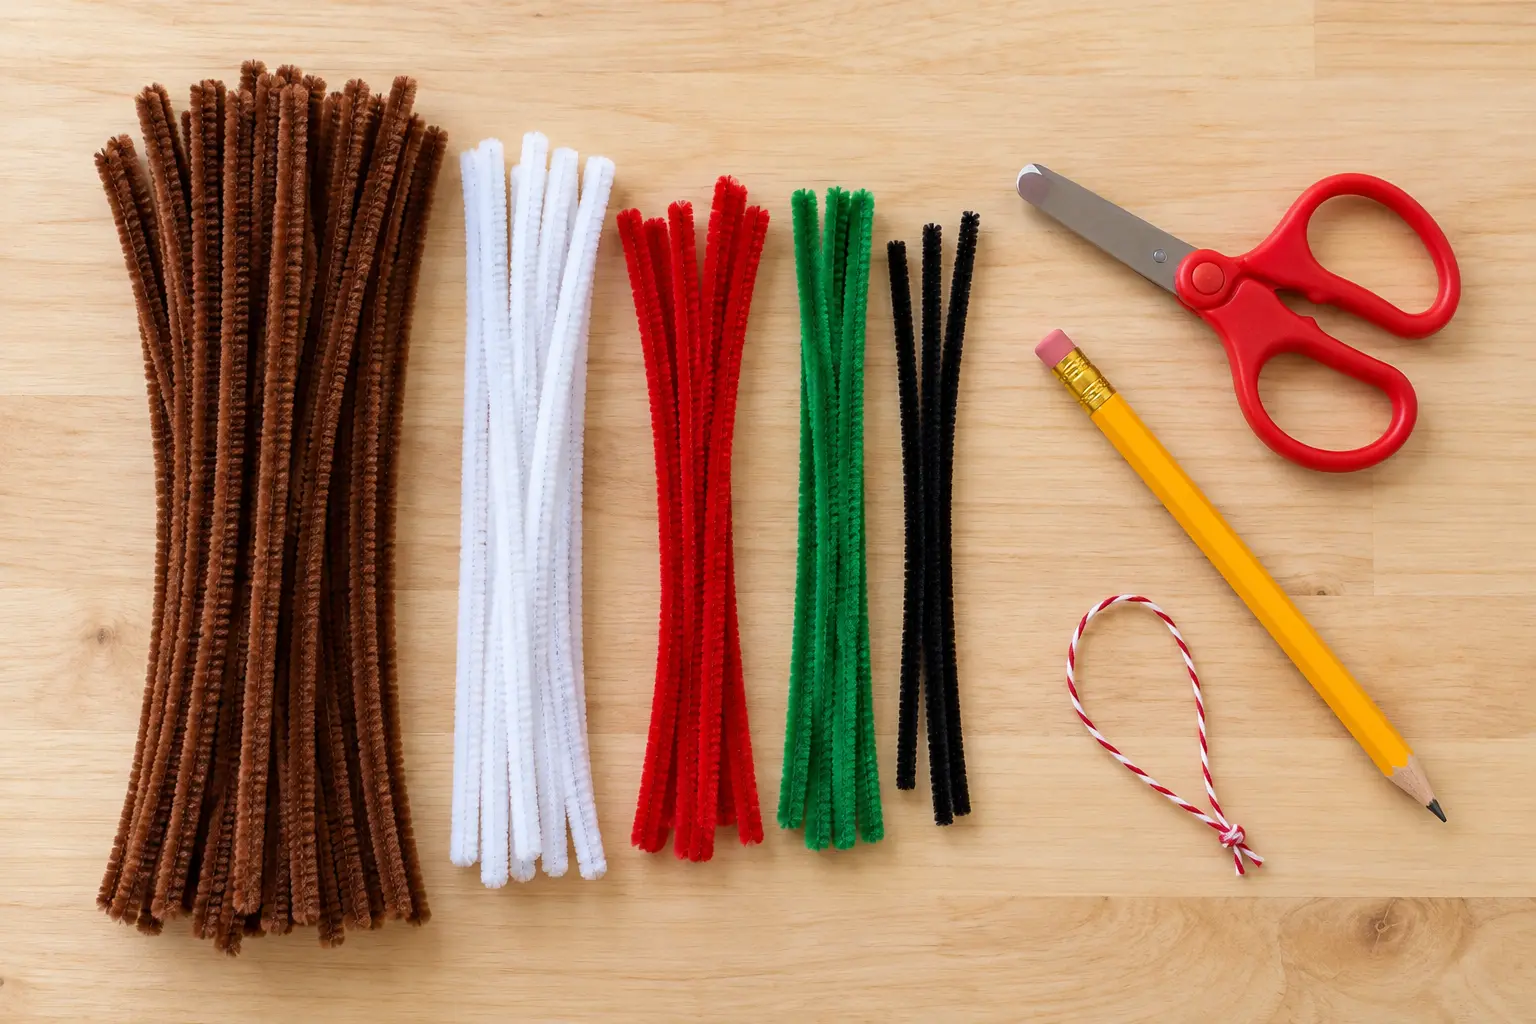
Standard 12-inch chenille stems work well. If your stems are unusually thin, use an extra brown stem around the torso and limbs. Thick stems make a plush-looking ornament, but they can become bulky at the joints. Use one thickness consistently for the brown structure, then choose thinner pieces for facial details when possible.
The design below does not require glue. Each part is secured by wrapping a short tail around the frame at least twice. If you prefer a decorative bead or pom-pom, make sure it can be attached securely and is appropriate for the person who will handle the craft.
Before You Start: Choose the Size and Style
A finished gingerbread man about 5 to 6 inches tall is large enough to decorate but light enough to hang on a tree. For that size, make the head roughly 1¼ inches across, the torso 2 inches long, and each arm and leg about 1½ to 2 inches from the body.
Decide whether your gingerbread person will be flat or slightly rounded. A flat figure is easier for children, gift toppers, garlands, and cards. A rounded figure uses more wrapping but looks more substantial as a standalone ornament. The same basic frame works for both versions.
Also choose the face before cutting decorative pieces. Two small black coils create eyes, while a thin white curve makes a smiling icing mouth. For a simpler version, bend the head into a clean circle and leave the face open. The fuzzy texture and icing trim will still make the character recognizable.
How to Make a Pipe Cleaner Gingerbread Man Step by Step
Step 1: Form the Head and Central Spine
Take one brown pipe cleaner and bend one end into a circle about 1¼ inches wide. Twist the short end around the stem directly below the circle two or three times. The remaining straight section becomes the central spine of the torso.
Pinch the head gently to make it round rather than teardrop-shaped. If the circle opens when you move it, tighten the neck twist. Leave the lower stem straight for now; it will help align the body and legs.
For a filled head instead of an open outline, coil another brown stem into a flat spiral that fits inside the circle. Secure the outer end around the head frame. A second option is to wrap a brown stem around the circular outline several times, gradually filling the center. Keep the front surface reasonably flat so the facial decorations sit neatly.
Step 2: Build the Torso
Start a second brown pipe cleaner just below the neck. Wrap its end around the spine twice, then make a loose oval loop around the spine. Continue wrapping the stem in stacked loops from the shoulders toward the waist. Press the loops together so there are no large gaps.
The torso should be wider at the shoulders and slightly narrower at the waist. Do not pull the loops so tightly that the spine bends. If one stem does not provide enough coverage, start another by hiding its end behind the body and wrapping it twice around the spine.
Turn the figure over and check the back. Any loose end should lie along the spine or tuck under an existing wrap. This makes the front smoother and prevents sharp tips from catching on fabric or tree branches.
Step 3: Add Both Arms
Center a full brown pipe cleaner horizontally behind the upper torso. The same amount should extend on each side. Wrap the middle of the arm stem once around the spine or neck base so it cannot slide.
For a slim figure, bend each side downward slightly and fold the final half inch inward to make rounded hands. For thicker arms, wrap another brown stem around each arm from shoulder to hand. Keep the wrapping even and stop before the folded hand so the end remains soft and rounded.
Compare the arms before moving on. They should be approximately equal in length and sit at the same height. Small differences are easy to fix now by sliding the center wrap or bending an elbow. Once decorative icing is added, adjustments become more difficult.
Step 4: Shape the Legs
Bring the remaining central spine to the bottom of the torso. Fold it upward briefly to anchor the waist, then position a new brown pipe cleaner in a wide upside-down V. Wrap the midpoint of the V firmly around the lower spine.
The two sides of the V are the legs. Make them the same length, then fold the last half inch of each leg forward to form rounded feet. For thick legs, spiral a brown stem around each leg from hip to foot. Avoid a large knot at the crotch; several small wraps distributed around the waist are stronger and neater than one bulky twist.
Place the figure on the table. The shoulders, hips, and feet should appear balanced around the centerline. If one leg points outward more than the other, bend it at the hip rather than twisting the ankle.
Step 5: Strengthen and Shape the Body
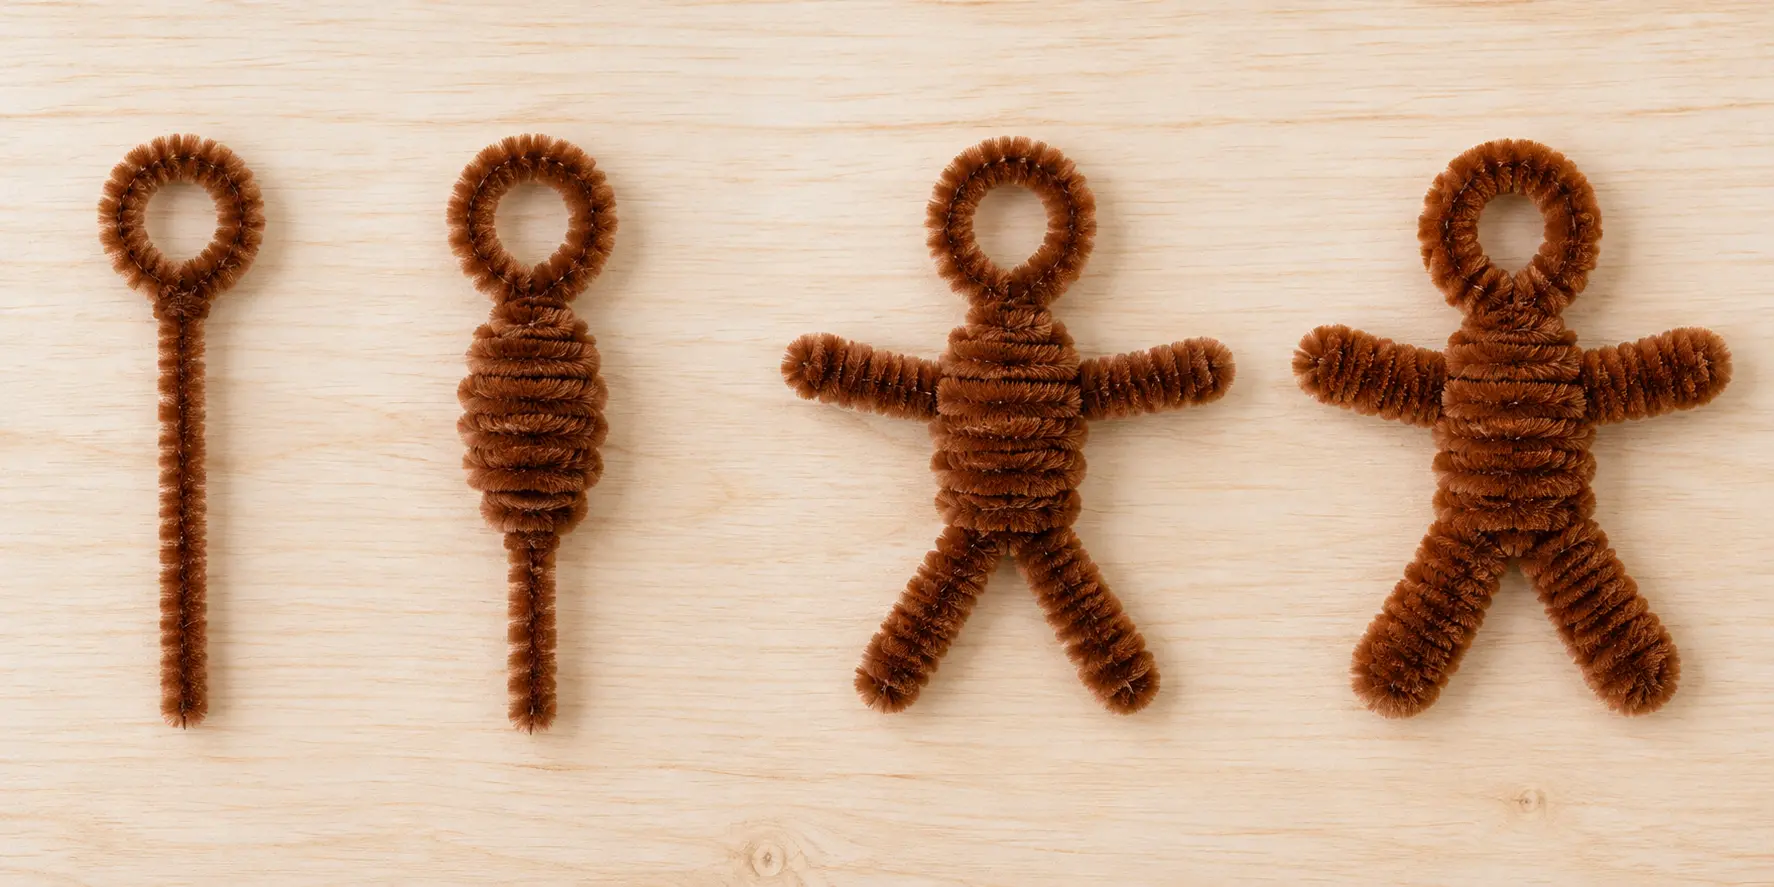

Gently squeeze the torso wraps together and curve the shoulders. Bend the arms slightly downward or give the figure small elbows. Shape the knees only if you want a playful pose; a flat ornament hangs more neatly when the legs remain mostly straight.
Lift the craft by the head and give it a very gentle shake. Nothing should rotate independently. Reinforce any loose joint by wrapping a short brown piece around it twice and tucking the end behind the body.
This is also the best moment to fold in every exposed wire tip. Use the soft chenille surface to cover the folded end. Do not wait until the white icing is attached, because later repairs can disturb the decoration.
Step 6: Add White Icing Trim
Cut four short white pieces for wrist and ankle trim. Wrap each piece around a limb in a small zigzag or wavy band. Two or three shallow bends look more like piped icing than a tight coil. Secure each end around the back of the limb.
For the face, bend a thin white piece into a smile and wrap each end around the head outline. If you want an icing border, curve another white stem along the outside of the head and attach it at several points with small wraps. Keep the white pieces on the front surface rather than letting them cross the eye area.
You can also add a short white zigzag across the chest or waist. Use restraint: clear bands at the wrists and ankles often look more convincing than covering the entire figure with decoration.
Step 7: Make the Face, Bow, and Buttons
For eyes, make two tiny black coils around the tip of a pencil. Slide them off, flatten them gently, and attach them symmetrically to the head. If tiny pieces are unsuitable for your crafting group, skip them or use two small bends that remain connected to a longer black stem wrapped behind the head.
To make a bow tie, form two equal red loops and pinch them together. Wrap a short tail around the middle, then attach the bow directly below the neck. A scarf is an easier alternative: wrap a red stem once around the neck and bend the ends downward, keeping it loose enough that it does not distort the head.
Make two buttons from small red or green coils. Secure them to the torso with their own tails, or pass one longer stem behind the body and form a coil on the front at each desired position. Tuck every end into the back wraps.
Step 8: Add a Hanging Loop
For a tree ornament, pass ribbon or cord through the top of the head frame and tie the ends together. A chenille loop also works: bend a short stem in half, place the fold above the head, and wrap both ends around the top of the frame.
Hold the ornament by the loop. If the figure tilts, move the attachment point slightly toward the higher side until the gingerbread man hangs straight. Do not attach the loop to a decorative bow or icing strip; use the structural brown head frame.
If the figure will stand in a table display instead, leave off the loop. Bend the feet forward and adjust the legs until the body balances. A small figure can also lean against a miniature pipe cleaner Christmas tree in a handmade holiday scene.
Easy No-Glue Version for Kids
For a simpler group project, prepare the central head-and-spine pieces before the activity. Give each child one prepared frame, one brown arm stem, one brown leg stem, and short decorative pieces. This reduces cutting and lets the activity focus on wrapping, shaping, and decorating.
Keep the torso flat rather than fully wrapped. Make a brown oval around the spine, secure it at the neck and waist, and add one horizontal stem for arms plus one V-shaped stem for legs. White wrist and ankle bands, a red bow, and two large buttons provide plenty of detail.
Adult help may be needed for tight joint wraps, cutting, and covering wire ends. A finished example helps children see the intended proportions, but invite them to choose their own colors and expressions. If your group enjoys adhesive-free projects, the connection methods in these pipe cleaner crafts without glue can provide additional practice.
Five Gingerbread Man Variations
1. Classic Gingerbread Girl
Use the same body and add two red or green bow loops near the head. A skirt can be made from three wide brown loops around the lower torso. Add white icing around the lower edge and keep the feet visible beneath it.
2. Mini Gingerbread Ornament
Cut standard stems in half and make a 3-inch figure. Simplify the decoration to one smile, two buttons, and four white bands. Mini figures are light enough for small trees, but the shorter pieces require more precise twisting, so they may be better for older children or adults.
3. Gingerbread Family
Make figures in three sizes and vary their bow ties, scarves, buttons, and poses. Keep the construction method consistent so the group looks coordinated. Hang them separately or connect them to a cord as a small family garland.
4. Candy-Cane Gingerbread Character
Twist a red and white pipe cleaner together and bend it into a miniature candy cane. Wrap the lower end around one hand so the character appears to hold it. This variation pairs naturally with the broader collection of pipe cleaner Christmas ornaments.
5. Gingerbread Gift Topper
Make a flat figure without a hanging loop. Pass gift ribbon behind the torso and tie it around a package, or secure the figure beneath a bow. Because the topper is reusable, the recipient can later add a loop and hang it as an ornament.
How to Make the Figure Look Neat
Use symmetry as a guide, not a demand for machine-perfect results. Check the arms and legs in pairs, then make small bends rather than rebuilding a whole section. The handmade variation is part of the charm, but balanced proportions make the gingerbread shape easier to recognize.
Hide joins on the back. Start and finish wrapping stems behind the torso, and place facial attachment points behind the head frame. When the front remains uncluttered, the white icing and colored buttons stand out.
Repeat colors deliberately. White icing, one accent color, and brown construction create a clear design. Too many unrelated colors can make a small ornament look busy. Red and green feel traditional, while pastel pink, mint, and white create a softer palette.
Finally, shape after assembling. Chenille stems remain flexible, so you can adjust the head, elbows, hips, and feet once all structural pieces are connected. Add tiny decorative parts only after the silhouette looks right.
Troubleshooting Common Problems
The Head Keeps Tilting
The neck connection is probably too loose. Wrap a short brown piece around both the head base and upper spine, then tuck the ends behind the torso. Check that a heavy bow or hanging loop is not pulling to one side.
The Arms Rotate
Unwrap the center of the arm stem and pass it around the central spine rather than only around the outer torso loops. Two tight center wraps should stop rotation. Re-cover the joint with the upper torso wrap.
The Legs Are Uneven
Place the figure flat and align both feet. Shorten the longer leg by adding a small bend at the hip or knee. If the difference is large, loosen the waist connection, recenter the V-shaped leg stem, and wrap it again.
The Body Looks Too Thin
Add one brown stem around the torso in stacked horizontal loops. Keep the widest loops near the shoulders and taper slightly toward the waist. You can thicken limbs with a loose spiral instead of tightly winding multiple layers.
Decorative Pieces Fall Off
Each piece needs a mechanical connection. Leave a short tail on every smile, button, icing band, and bow, then wrap that tail around the brown frame. A decorative piece pressed against the surface without a wrap will not stay attached.
Ways to Display Pipe Cleaner Gingerbread People
Hang one on a Christmas tree, tie one to a wrapped gift, or connect several to a ribbon garland. A set can decorate a classroom bulletin board when the figures are attached through their hanging loops rather than stapled through the chenille stems.
For a table scene, combine a gingerbread family with a small tree, wrapped gift shapes, and a pipe cleaner reindeer. For a floral holiday display, tuck one lightweight figure beside a handmade pipe cleaner poinsettia or add it to a seasonal centerpiece without crushing the arms.
Store the finished craft flat in a box with tissue paper. Avoid placing heavy decorations on top. If a limb bends during storage, straighten the internal wire slowly instead of pulling on the outer fuzzy fibers.
Frequently Asked Questions
How many pipe cleaners do you need for a gingerbread man?
A medium gingerbread man usually needs five to seven brown pipe
cleaners plus short white, red, green, and black pieces for decoration.
A flat simplified figure can use fewer stems, while a thick wrapped
figure needs more.
Can you make a pipe cleaner gingerbread man without glue?
Yes. Secure the head, torso, arms, legs, icing, and decorations with
tight wraps around the central frame. Tuck all ends into the back of the
figure so the connections remain neat and secure.
How do you turn it into a Christmas ornament?
Attach ribbon, cord, or a short chenille-stem loop to the structural
frame at the top of the head. Test the balance before hanging it and
move the loop slightly if the figure tilts.
What is the easiest version for children?
Use a prepared head-and-spine frame, a flat oval torso, one
horizontal arm stem, and one V-shaped leg stem. Add large white bands
and a bow instead of tiny facial pieces. Adults should help with
cutting, tight twists, and exposed wire ends as needed.
How do you keep the arms and legs from moving?
Wrap each limb directly around the central spine, not only around the
outer body loops. Reinforce a loose joint with a short brown piece and
hide the ends behind the torso.
Can you make a gingerbread garland with pipe cleaners?
Yes. Make several lightweight flat figures and connect their hanging
loops to ribbon or cord. Space them evenly and add small stars, candy
canes, or bows between the figures.
Can the finished figure stand up?
A rounded figure can stand if the feet are bent forward and the legs
are balanced, although it may need to lean against another decoration. A
flat version is better suited to hanging, gift toppers, cards, or wall
displays.
Final Check Before Displaying
Before you hang or give the craft, inspect the back and sides. Every end should be folded inward, the head and limbs should remain stable when gently moved, and the hanging loop should connect to the brown structural frame. Reshape the smile, bow, and icing bands after this check.
Once the structure is secure, your pipe cleaner gingerbread man is ready for the tree, a gift, a garland, or a holiday scene. The same wrapping method can be repeated in different sizes, making it easy to build a coordinated gingerbread family or combine the figure with other easy pipe cleaner Christmas crafts.