

A pipe cleaner reindeer is a small Christmas craft made by twisting brown chenille stems into a body, four legs, a neck and head, then adding branched antlers. The basic structure can be assembled without glue because the wire cores lock together when wrapped firmly. This tutorial shows you how to build a reindeer that stands, how to shape balanced antlers, and how to turn the finished craft into an ornament or holiday decoration.
If you are building a collection of holiday projects, start with our pipe cleaner Christmas crafts, then pair this reindeer with a pipe cleaner Christmas tree or handmade pipe cleaner snowflake.
Materials Needed for a Pipe Cleaner Reindeer
- 6–8 brown pipe cleaners for the body, legs, head and antlers
- 1 tan or light-brown pipe cleaner for optional muzzle and ear details
- 1 red pipe cleaner for a Rudolph-style nose or scarf
- 1 black pipe cleaner for small hoof or facial accents, optional
- Ribbon, cord or another pipe cleaner if you want a hanging ornament
- Scissors or wire cutters only if you want shorter detail pieces
Chenille stems contain wire. Fold sharp cut ends inward and supervise children according to their age and crafting experience.
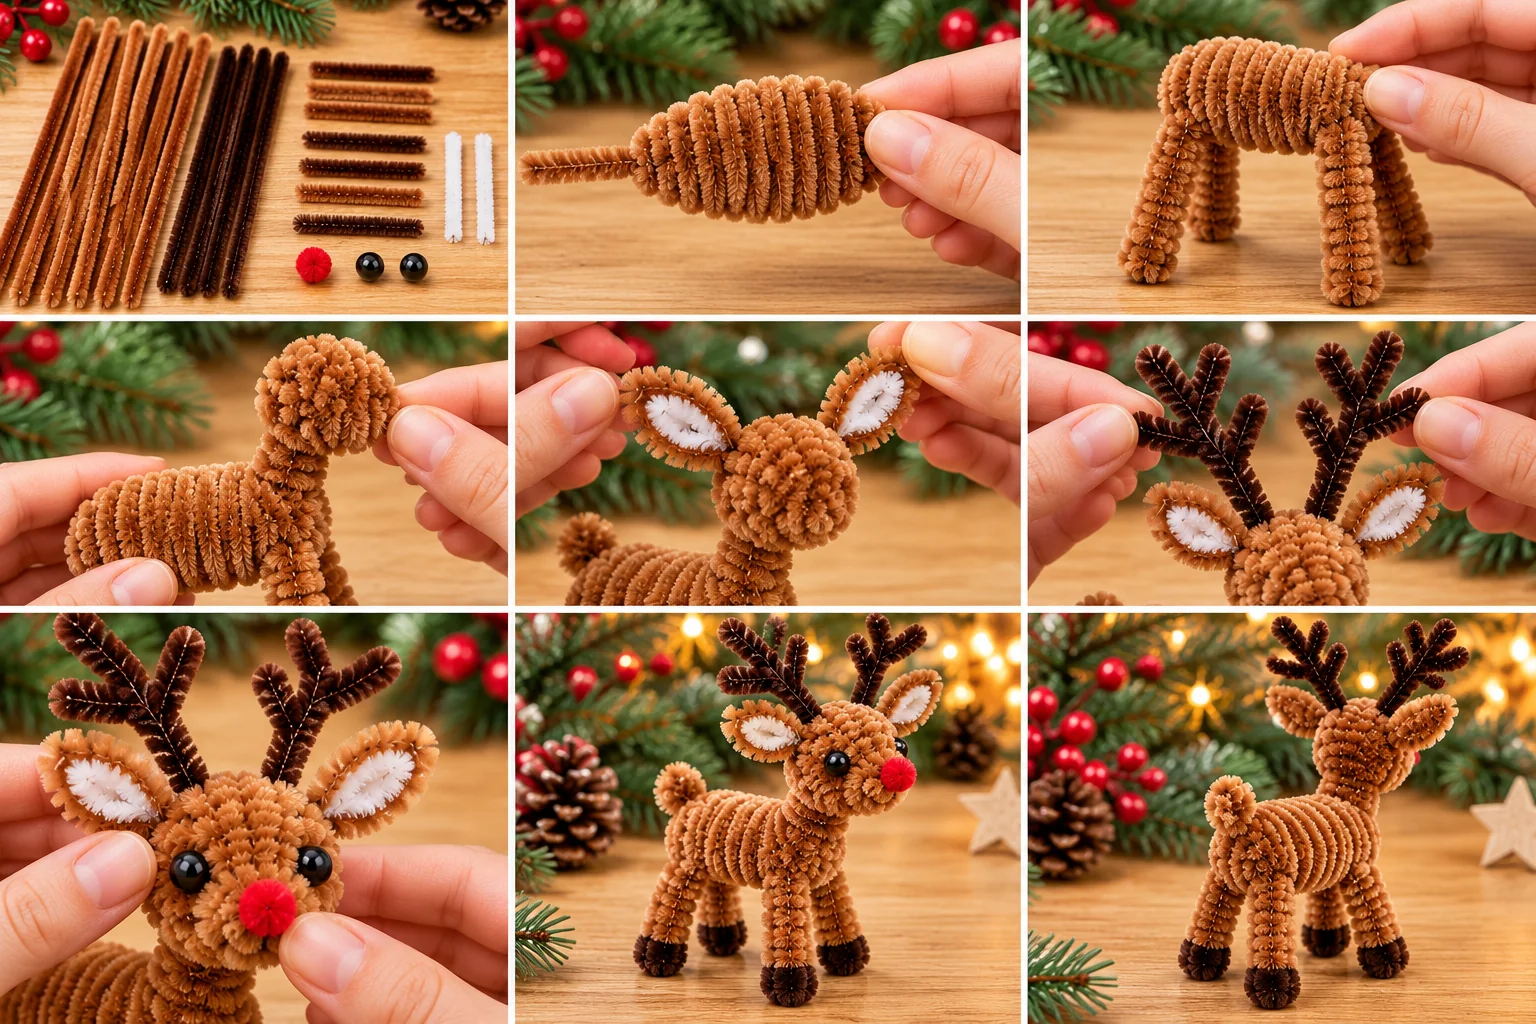
How to Make a Pipe Cleaner Reindeer Step by Step
Step 1: Build the Body
Take two brown pipe cleaners and align them. Twist them together loosely from end to end to make a thicker core. Bend the center into a compact horizontal oval. Wrap the free portions around the oval until the body feels firm but still slightly flexible. Keep the joins underneath so the top looks clean.
Step 2: Make Four Stable Legs
Use two brown stems for the legs. Fold each stem in half, then position one folded stem under the front half of the body and the other under the back half. Twist each stem around the body once to lock it. Separate the four ends downward. Bend a short section at each bottom end forward to create feet. Adjust all four legs until the body stands level.
Step 3: Shape the Neck and Head
Wrap a brown stem around the front of the body two or three times and angle the remaining length upward for the neck. Coil the upper portion into a small oval head. Pinch the front slightly to suggest a muzzle. If the head feels loose, pass the stem tail once more around the neck rather than relying on glue.
Step 4: Add the Ears
Make two small teardrop loops from a short brown or tan stem. Twist the base of each loop closed and wrap the tails around the sides of the head. Angle the ears slightly outward so they remain visible beside the antlers.
Step 5: Make the Antlers
Fold a dark-brown pipe cleaner in half. Each half becomes one antler. Bend two or three short branches along each side, keeping the left and right antlers similar in height. Twist the center fold around the top/back of the head. Spread the branches after attachment instead of making them very wide before fastening them.
Step 6: Shape the Face
For a simple no-glue face, coil a tiny section of dark pipe cleaner for the nose and secure it by wrapping its tail around the muzzle. Use red instead for a Rudolph-inspired version. Small looped pieces can suggest eyes, but keep facial pieces securely wrapped and avoid loose tiny decorations when crafting with young children.
Step 7: Add a Tail and Christmas Details
Twist a short brown piece around the back of the body and curl it upward for a tail. A narrow red or green stem can be wrapped once around the neck as a scarf. You can also add a small bow or bell when the craft is intended for decorative use and the accessory is securely attached.
Step 8: Balance the Reindeer
Place the reindeer on a flat surface. Move the front legs slightly forward and the back legs slightly backward. Flatten the feet and center the head above the front legs. If it tips forward, reduce the spread of the antlers or angle the neck back a little. Small adjustments are usually more effective than adding extra material.
How to Make a Pipe Cleaner Reindeer Without Glue
The key is to use each stem tail as a fastener. Wrap connections around an existing wire core at least once, press the twist flat, and tuck the end toward the inside of the body. The body, legs, neck, ears, antlers and tail can all be connected this way. Optional beads, pom-poms or other embellishments may require a different attachment method, so they are not necessary for the basic no-glue version.
For more projects based on twisting rather than adhesive, see our pipe cleaner crafts without glue and no-glue pipe cleaner flowers.

5 Pipe Cleaner Reindeer Variations
1. Rudolph Reindeer
Use a small red coil at the end of the muzzle and add a red scarf. Keep the rest of the structure brown so the nose remains the visual focal point.
2. Mini Reindeer Ornament
Shorten the body and legs, then add a hanging loop around the upper body or neck connection. Check that the ornament hangs upright before tightening the loop.
3. White Winter Reindeer
Replace brown stems with white or cream chenille and keep the antlers tan, brown or metallic. This version works well beside icy-blue decorations and snowflakes.
4. Reindeer with Large Antlers
Use one full stem for each antler and form several short branches. Reinforce the neck before attaching them because larger antlers add weight above the head.
5. Reindeer Family
Make the same structure in three sizes by changing the length of the body, legs and antlers. Repeating the same construction method keeps the figures visually consistent.
Turn It Into a Pipe Cleaner Reindeer Ornament
For a tree ornament, make the body smaller and keep the legs compact. Wrap a thin cord or chenille loop around the upper back close to the neck. Lift the ornament by the loop before hanging it on the tree. If the head drops, move the hanger slightly forward; if the reindeer tilts backward, move it toward the center of the body.
You can combine the reindeer with the designs in our pipe cleaner Christmas ornaments guide for a coordinated handmade tree.
Common Problems and Easy Fixes
- The reindeer falls forward: narrow the antlers, flatten the feet and move the front legs slightly forward.
- The head keeps turning: add another wrap where the neck joins the body.
- The legs spread apart: twist their upper sections more firmly around the body and rebend the feet.
- The antlers look uneven: compare the main stems first, then adjust the smaller branches one at a time.
- The body looks too thin: wrap another brown stem around the body core instead of making the oval longer.

Christmas Display Ideas
Stand several reindeer around a miniature tree, place one beside a handmade gift tag, use a small version as an ornament, or create a winter scene with snowflakes and other Christmas figures. For floral holiday décor, the pipe cleaner poinsettia provides a complementary red-and-green project without competing with the reindeer tutorial.
Pipe Cleaner Reindeer FAQ
How do you make a pipe cleaner reindeer?
Build a compact brown body, attach four bendable legs, add an upright neck and oval head, then twist on ears and branched antlers. Finish by balancing the feet and adding optional Christmas details.
Can you make a pipe cleaner reindeer without glue?
Yes. The basic body, legs, head, ears, antlers and tail can be connected by wrapping and twisting chenille-stem ends around the structure. Optional embellishments may use other attachment methods.
How do you make pipe cleaner reindeer antlers?
Fold a dark-brown stem in half and bend two or three small branches along each side. Attach the center fold to the top of the head, then adjust both sides for a balanced shape.
How can I make a pipe cleaner reindeer stand up?
Flatten all four feet, position the front legs slightly forward and the back legs slightly backward, and keep the antlers light and centered over the body.
How do I turn the reindeer into a Christmas ornament?
Make a smaller reindeer and secure a hanging loop around the upper back near the neck. Test the balance before tightening the loop so the reindeer hangs upright.
What colors work for a pipe cleaner reindeer?
Brown and tan create a classic look, while white or cream works for a winter style. Red and green are useful for small Christmas accents such as a nose or scarf.
2 thoughts on “How to Make a Pipe Cleaner Reindeer – Easy Christmas Craft”