
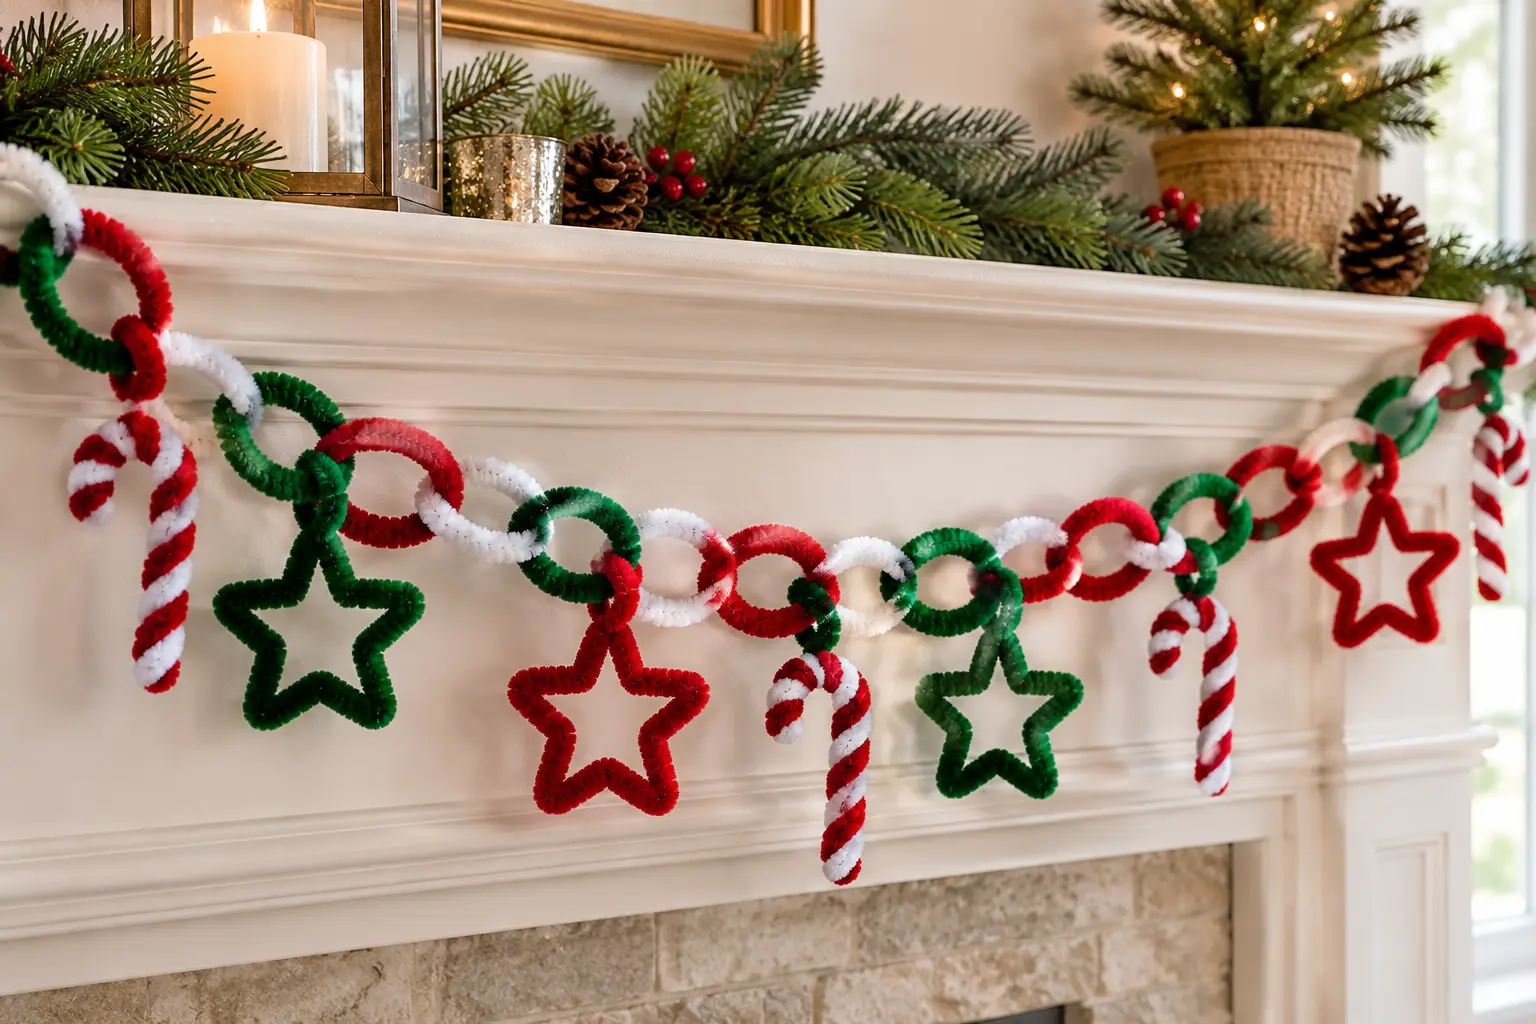
A pipe cleaner garland is made by shaping chenille stems into linked rings, then adding simple motifs such as stars, candy canes, bows, or tiny wreaths. You do not need hot glue: twist each ring closed, connect the next ring through it, and repeat until the chain reaches the length you need. For a balanced Christmas garland, alternate red, green, and white and place a decorative motif every four to six links.
This method is easy enough for a family craft afternoon or classroom station, but the finished decoration can still look neat on a mantel, shelf, small tree, doorway, bulletin board, or gift table. The key is to plan the length first, keep every link close to the same size, and make secure twists that do not leave sharp wire ends exposed.
Why a Pipe Cleaner Garland Works So Well
Pipe cleaners are flexible, lightweight, colorful, and reusable. Unlike paper chains, they do not tear if the garland is moved. Unlike heavier ornaments, they do not need strong hooks. A finished strand can bend around a small tree, follow the edge of a shelf, or hang in a soft curve between two removable hooks.
The project is also forgiving. A slightly uneven ring does not ruin the strand, and a link can be opened, reshaped, or replaced without rebuilding the whole decoration. That makes this a practical first holiday craft for beginners. If you want more quick seasonal projects before choosing your garland motifs, browse these easy pipe cleaner Christmas crafts.
This tutorial uses a chain as the main structure because it is the simplest no-glue option. Later sections show how to add stars, candy canes, mini wreaths, flowers, beads, bells, and personalized color patterns without making the strand too heavy.
Materials for a No-Glue Pipe Cleaner Garland
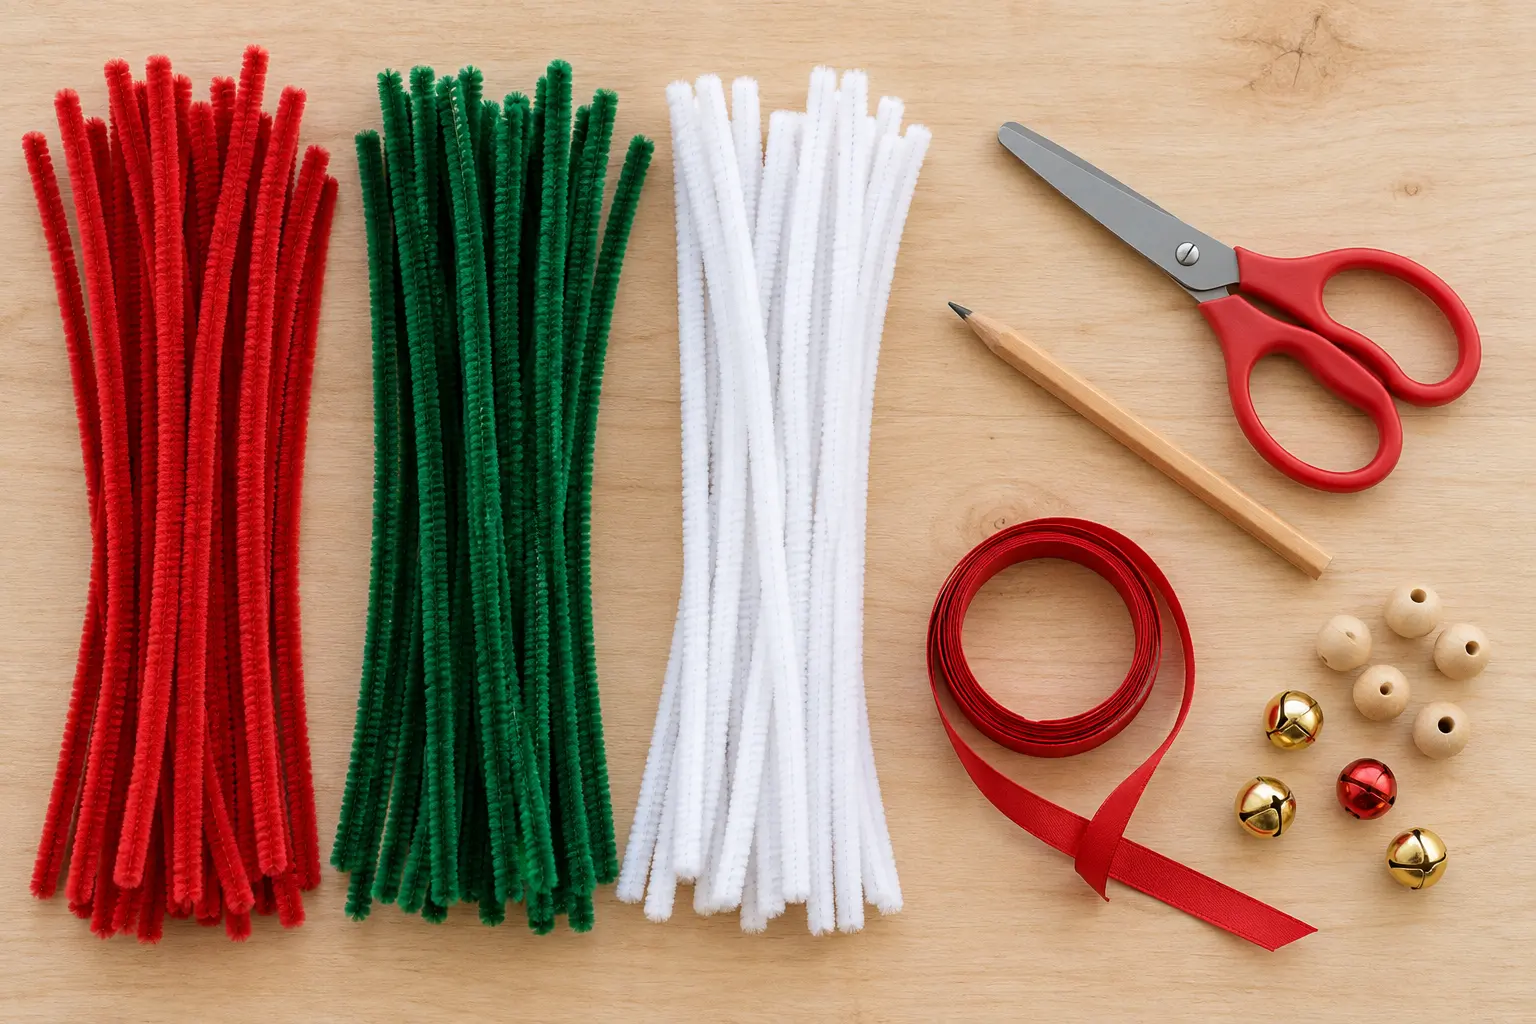
For a basic 6-foot garland, gather:
- 30 to 40 standard 12-inch pipe cleaners in your main colors
- One ruler or measuring tape
- Child-safe scissors for adult-supervised cutting
- A pencil or marker to use as a shaping guide
- 12 to 18 inches of narrow ribbon for hanging loops, if desired
- Optional wooden beads with holes wide enough for a pipe cleaner
- Optional lightweight jingle bells
- Optional cardboard star template for consistent motifs
Standard pipe cleaners are usually long enough to form one medium ring. For smaller rings, cut stems in half. Smaller links create a denser, more polished-looking garland but require more pieces. Metallic stems can add sparkle, although they sometimes feel stiffer than regular chenille stems. Use them as accents rather than for every link if children are making the project.
Choose two or three main colors before you begin. Red, green, and white make a classic Christmas pipe cleaner garland. Blue, white, and silver create a winter look. Pink, red, and white work for Valentine’s Day, while orange, purple, black, and green can turn the same construction into Halloween decor.
If avoiding adhesive is important for your craft area, the same twist-and-wrap principles appear in these pipe cleaner crafts without glue.
Plan the Garland Length Before You Start
Measure the place where the garland will hang, then add extra length for the curve. A strand pulled perfectly straight looks stiff; a gentle swag looks more intentional.
Use these practical starting points:
- Small tabletop tree: 4 to 6 feet
- Mantel or shelf: measured width plus 12 to 24 inches
- Classroom bulletin board: measured top edge plus 18 inches
- Standard interior doorway: 12 to 16 feet for the top and both sides
- Gift table front: table width plus 12 inches
For a single 12-inch stem shaped into an oval ring, expect each finished link to add roughly 2 to 3 inches to the chain. The exact amount changes with ring size and overlap. Make five test links, measure that short section, and use it to estimate how many links you need. For example, if five links span 12 inches, a 6-foot strand will need about 30 links. Add two or three extra stems for repairs and hanging loops.
Do not rely only on the unbent length of the stems. Each ring uses part of its material in the closing twist, and the links overlap when connected. A test section gives a much better estimate than multiplying by 12 inches.
Choose a Repeatable Color Pattern
Lay the stems in order before making the chain. A repeating red-green-white pattern is easy to follow. You can also try:
- Two red links, two green links, one white link
- Red and white alternating like a candy cane
- Dark green links with a gold accent every fifth link
- A gradient from white to pale blue to navy
- School or team colors for classroom celebrations
Photograph or write down the repeat if several people are working on one garland. That prevents the pattern from changing halfway through.
How to Make a Pipe Cleaner Garland Step by Step
The basic technique is simple: form one closed ring, thread a new stem through it, close the second ring, and continue. Work on a flat table so the chain does not twist around itself.
Step 1: Sort and Straighten the Stems
Group the pipe cleaners by color. Smooth any tight bends with your fingers, but do not pull so hard that the chenille fibers separate from the internal wire. Set aside bent or unusually thin stems for small decorative pieces rather than structural links.
If you are making small rings, have an adult cut the stems into equal halves. Keep the cut ends together in a small tray so they do not scatter across the work surface.
Step 2: Make the First Ring
Curve one pipe cleaner into an oval. Overlap the ends by about 1 inch. Twist the two ends around each other two full times. Press the tips flat against the ring so no wire point sticks outward.
For consistent links, wrap each stem around the same pencil, marker, or small cardboard tube before closing it. Slide the ring off the form, then secure the overlap. The ring does not need to be perfectly round; an even oval usually lies more naturally in a hanging chain.
Step 3: Add the Second Link
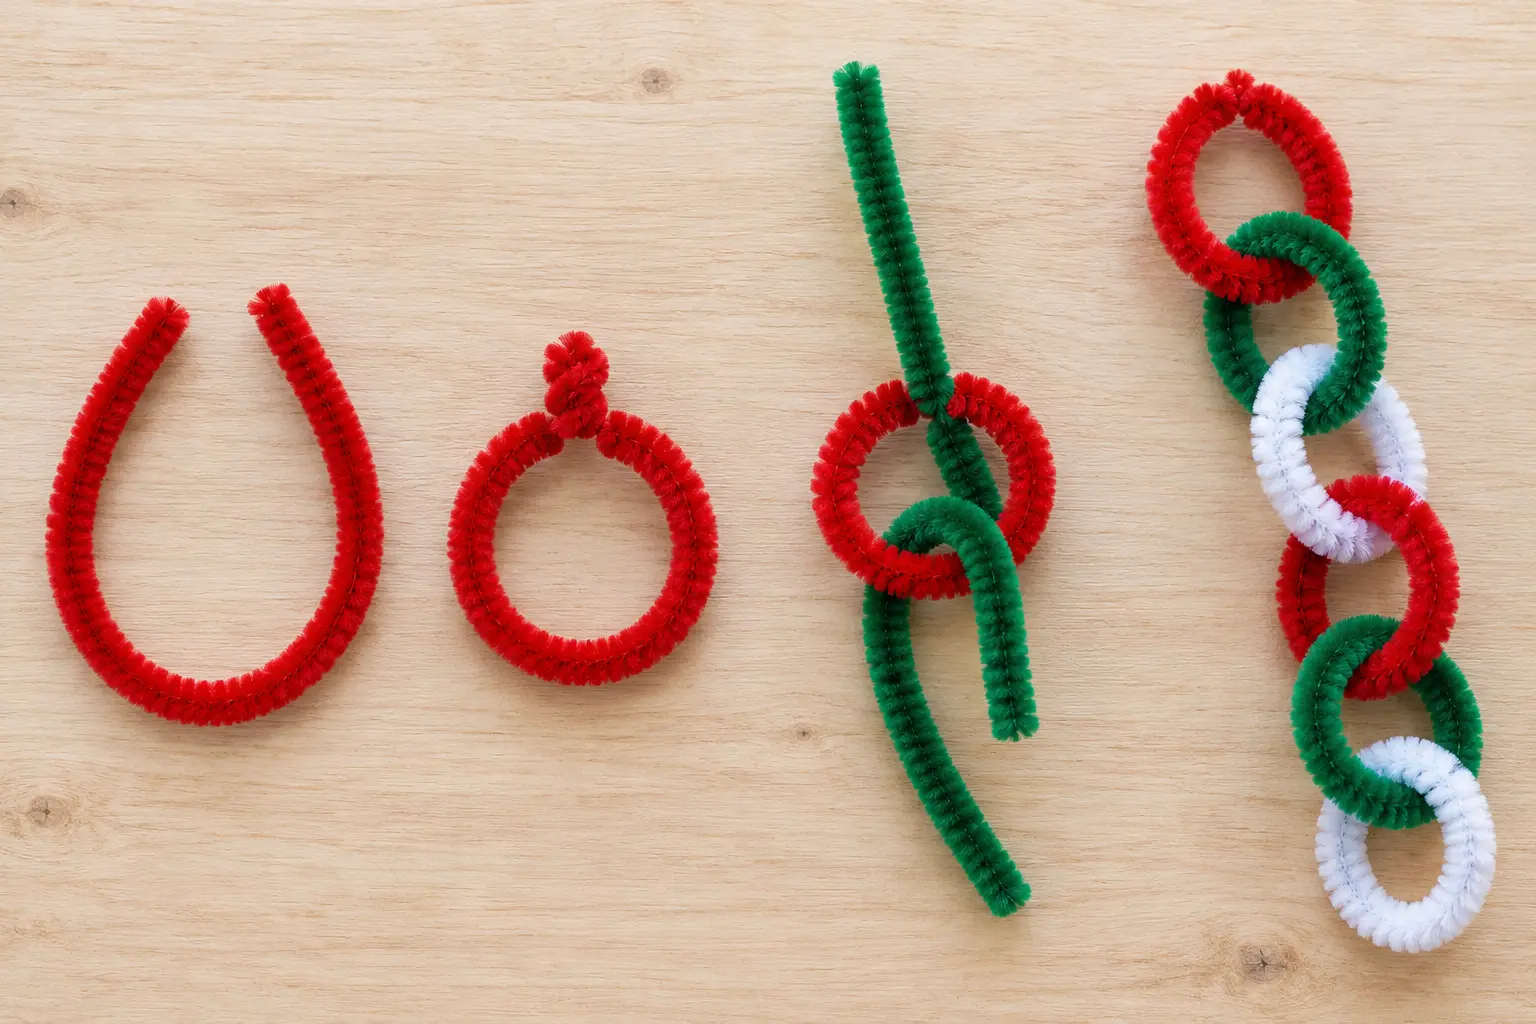
Pass the next pipe cleaner through the first closed ring. Curve it into the same size oval and twist its ends together twice. Before tightening, check that the two rings move freely and are not wrapped around each other at the joint.
Continue with the next color in your planned pattern. Each new ring must pass through only the final link, not through two links at once. This keeps the chain flexible and prevents bulky clusters.
Step 4: Keep the Closing Twists Consistent
Place every closure on the inside or back of its ring. Two firm twists are usually enough. Too few twists can open under the strand’s weight; too many create a hard lump and shorten the link.
After every five links, run a fingertip around the closures. Fold any exposed end back into the fuzzy surface. For children, an adult should inspect cut ends and stiff metallic stems before the garland is hung.
Step 5: Check the Pattern and Length
Lay the chain straight after every five to eight links. Confirm the color repeat, gently reshape flattened rings, and measure the growing strand. Correcting one misplaced link is easier now than after another dozen links are attached.
If the strand begins to spiral, rotate the newest ring before closing it. A little movement is normal, but every ring should sit approximately perpendicular to the rings beside it when the chain hangs.
Step 6: Add Decorative Motifs
For a mixed garland, stop every four to six rings and add one lightweight motif. Attach it with a short half-stem folded around a link. Twist the connector twice behind the motif, then tuck its ends flat.
You can use stars, candy canes, snowflakes, bows, mini wreaths, leaves, or simple flowers. Keep each piece compact so it does not pull the chain down. For a crisp star, practice the basic bends in this guide to making pipe cleaner shapes. A winter strand can also borrow small motifs from the pipe cleaner snowflake tutorial.
Step 7: Make Hanging Loops
At each end, fold a 6-inch piece of ribbon through the final link and knot the ribbon into a loop. If you prefer an all-pipe-cleaner project, add one extra small ring at each end and twist it securely closed.
Hanging loops reduce stress on the decorative links. They also make it easier to move the garland without pulling the chenille chain directly.
Step 8: Hang and Adjust the Garland
Support the strand at both ends and, for a long garland, at one or more points in the middle. Use removable hooks, existing nails, ribbon ties, or twist ties appropriate for the surface. Do not place pipe cleaners directly against an open flame, hot bulb, heater, or fireplace opening.
Step back and adjust the curve. Rotate individual motifs to face forward, spread out compressed chenille fibers, and shorten hanging loops if the strand sits too low. On a small tree, wind the chain loosely around the branches rather than pulling it tight.
Three Reliable No-Glue Connector Methods
The linked-ring method is the easiest, but different decorations call for different connections.
Interlocking Rings
Use interlocking rings for the main chain. They are flexible, quick to repair, and ideal for younger crafters. Each new stem passes through the previous closed ring before its own ends are twisted together.
This method creates visible volume and works especially well on a small Christmas tree. Pair it with lightweight handmade pieces from this collection of pipe cleaner Christmas ornaments.
Short Twist Connectors
Cut a pipe cleaner into four equal pieces. Use each short piece like a soft tie between a motif and the chain. Wrap it once around the garland link, once around the motif, then twist the ends together behind the decoration.
Short connectors are useful for stars, flowers, bows, and small characters. Because the motif can swing slightly, the garland looks lively instead of rigid. Match the connector color to the chain so it blends in.
Wrapped Spine
For a flatter garland, overlap full-length stems by 1 to 2 inches and twist the overlapping ends together. Continue until you have a long flexible spine. Attach small motifs along it with short connectors.
This construction is less bulky than a ring chain and works well across a mantel or bulletin board. It also resembles the basic structure used in a pipe cleaner wall hanging, although a garland should remain light enough to curve between its supports.
Easy Pipe Cleaner Garland Variations
Once you understand the chain, you can change the look without changing the basic construction.
Classic Christmas Chain
Alternate red, green, and white rings. Add a red star after every five links and finish with red ribbon loops. This is the quickest version and the easiest to divide among several children: each person can make a short section, and an adult can connect the sections at the end.
Candy Cane Garland
Twist one red and one white stem together, then bend the pair over a pencil to form a hook. Make several small candy canes and attach one every four links. Keep the hooks facing in alternating directions for a balanced pattern.
Star and Snowflake Garland
Use dark blue, pale blue, white, and silver links. Alternate five-point stars with small six-arm snowflakes. This version can stay on display after Christmas because the palette reads as winter decor rather than a single holiday.
Mini Wreath Garland
Shape green stems into small circles, twist the ends closed, and add tiny red bows made from half-stems. Connect each mini wreath between sections of three or four plain rings. For another botanical accent, add a few shapes inspired by this pipe cleaner leaf tutorial.
Floral Christmas Garland
Make a dark green chain and attach small red poinsettias at even intervals. Use only one or two stems per flower so the decorations stay light. The pipe cleaner poinsettia tutorial offers a useful starting shape; scale the petals down for a garland.
Personalized Name Garland
Form one large letter from a full pipe cleaner for each character in a child’s name or a short word such as JOY. Attach the letters to a straight wrapped spine rather than a ring chain so they remain upright. Keep spacing consistent by laying the complete word on the table before adding connectors.
Beaded or Bell Garland
Thread one wooden bead or lightweight bell onto a stem before closing selected rings. Place an accent every four to six links. Do not overload the chain: heavy beads stretch links and can make the strand sag unevenly.
How to Make the Garland Look Neater
A polished result depends more on consistency than complexity. Use the same shaping form for every ring, hide all closure twists on one side, and repeat motifs at regular intervals.
Limit the palette to three main colors and one accent. Too many unrelated colors can make a short strand look busy. If you want several types of motifs, repeat them in a predictable order—star, candy cane, wreath, then repeat—instead of placing them randomly.
Leave breathing room around detailed motifs. A star placed after every link will overlap its neighbors. A gap of four to six simple rings makes each decorative piece easier to see.
Finally, hang the strand before declaring it finished. A pattern that looks crowded on the table may spread out when suspended, and a motif that seems centered may rotate backward. Small adjustments are part of the process.
Troubleshooting Common Problems
The Rings Keep Opening
Increase the overlap to about 1 inch and make two full twists. If a stem is unusually soft, wrap one end once more around the ring instead of making a third bulky twist. Replace damaged stems rather than tightening until the wire breaks.
The Garland Twists Into a Spiral
Lay the strand flat and rotate each newest ring so it sits at a right angle to the previous link. Make the next few links slowly, checking their orientation before closing them. A loose decorative twist is harmless, but a tight spiral can hide the color pattern.
The Garland Sags in the Middle
Add a center support point. Long strands should not hang only from their end loops. Remove heavy beads or oversized motifs, and use shorter sections connected at the display instead of one very long unsupported chain.
The Links Are Uneven
Use a pencil, marker, or cardboard tube as a form. If the chain is already complete, reshape each ring with your fingers while the strand lies flat. Slight variations are natural in a handmade decoration and will be less noticeable once it hangs.
Cut Ends Feel Sharp
Fold the tip back along the stem and cover it with surrounding chenille fibers. An adult should trim only when necessary, because a new cut creates another exposed wire end. Do not use a finished piece if the internal wire is broken or cannot be tucked safely.
Motifs Turn Backward
Attach each motif at two nearby points instead of one, using two short connectors. This is especially helpful for large stars or letters. Another option is to attach motifs to a wrapped spine, which provides a flatter base than interlocking rings.
Safe Crafting and Display Tips
Pipe cleaners contain flexible wire. Supervise young children, handle cut ends carefully, and keep small beads and bells away from children who may put them in their mouths. Scissors should match the child’s age and skill level.
This garland is decorative, not a toy. Do not hang it over a crib, playpen, or sleeping area. Keep it away from candles, fireplaces, stove surfaces, hot light bulbs, and heaters. Use battery-operated lights only if their manufacturer allows contact with craft decorations, and never wrap the garland tightly around electrical connections.
For a classroom, prepare equal bundles of stems and demonstrate one finished link before distributing materials. A tray for cut pieces keeps wire ends contained. If children make separate chain sections, an adult can inspect and connect them.
Display, Store, and Reuse the Garland
On a mantel or shelf, create one or two shallow curves and support the middle. Around a pipe cleaner Christmas tree, wrap the chain loosely so the branches remain visible. On a classroom board, attach only the end loops and selected support points rather than stapling through the pipe cleaners.
To store the garland, remove detachable bells or large motifs first. Coil the chain loosely around a sheet of cardboard, place tissue paper between layers, and keep it in a shallow box. Do not crush it under heavy decorations. When you unpack it, straighten the strand on a table and reshape individual rings before hanging.
A ring-chain garland can also be reused by swapping motifs. Remove poinsettias after Christmas, keep the red and white links, and add hearts for Valentine’s Day. A green-and-white base can become a spring display with small flowers. This modular approach reduces the number of full decorations you need to store.
Frequently Asked Questions
How many pipe cleaners do I need for a garland?
A 6-foot chain usually needs about 30 standard pipe cleaners when each stem forms one medium link. Make five links and measure them before calculating the full amount, because ring size and overlap change the final length. Add two or three extra stems for repairs and hanging loops.
Can I make a pipe cleaner garland without glue?
Yes. Close each ring with two firm twists, pass the next stem through it, and repeat. Attach motifs with short pipe-cleaner ties. Ribbon loops can be knotted through the end links, so no glue is required anywhere in the project.
What is the easiest garland style for kids?
An alternating-color ring chain is the easiest. Use full-length stems, demonstrate a two-twist closure, and let children build short sections. An adult can inspect exposed ends and join the sections into one garland.
How long should a Christmas garland be?
Measure the display area and add 12 to 24 inches for a gentle curve. A small tabletop tree may need 4 to 6 feet, while a doorway can require 12 to 16 feet if the garland covers the top and both sides.
How do I stop a pipe cleaner garland from sagging?
Use a support point in the middle, keep motifs lightweight, and avoid too many beads or bells. For a long display, make several shorter sections and connect them after hanging rather than placing all the weight on two end loops.
Can I use tinsel pipe cleaners?
Yes, but metallic or tinsel stems can be stiffer and their cut ends may feel sharper. Use them for occasional accent links, fold the ends inward, and have an adult inspect the finished garland before display.
Can the garland be used outdoors?
Only for short, dry-weather display in a protected location. Moisture can affect the internal wire, wind can distort the links, and sunlight may fade the colors. Bring the garland indoors after use and let it dry completely before storage.
How can I attach ornaments to the garland?
Use a short pipe-cleaner connector. Wrap it once around a chain link and once around the ornament, twist the ends twice behind the piece, and tuck the tips flat. Keep every ornament light enough that the neighboring links hold their shape.
A Simple Handmade Decoration You Can Adapt
The most reliable pipe cleaner garland starts with uniform linked rings, a planned color repeat, and secure two-twist closures. Add lightweight motifs only after the base chain is working, support long spans in the middle, and tuck every wire end flat. With those details handled, the same no-glue method can become a classic Christmas chain, a winter snowflake strand, a floral mantel accent, or a personalized classroom decoration.
If you want to coordinate the finished garland with a larger arrangement, these Christmas pipe cleaner flower ideas offer complementary red, green, and white decorations.