
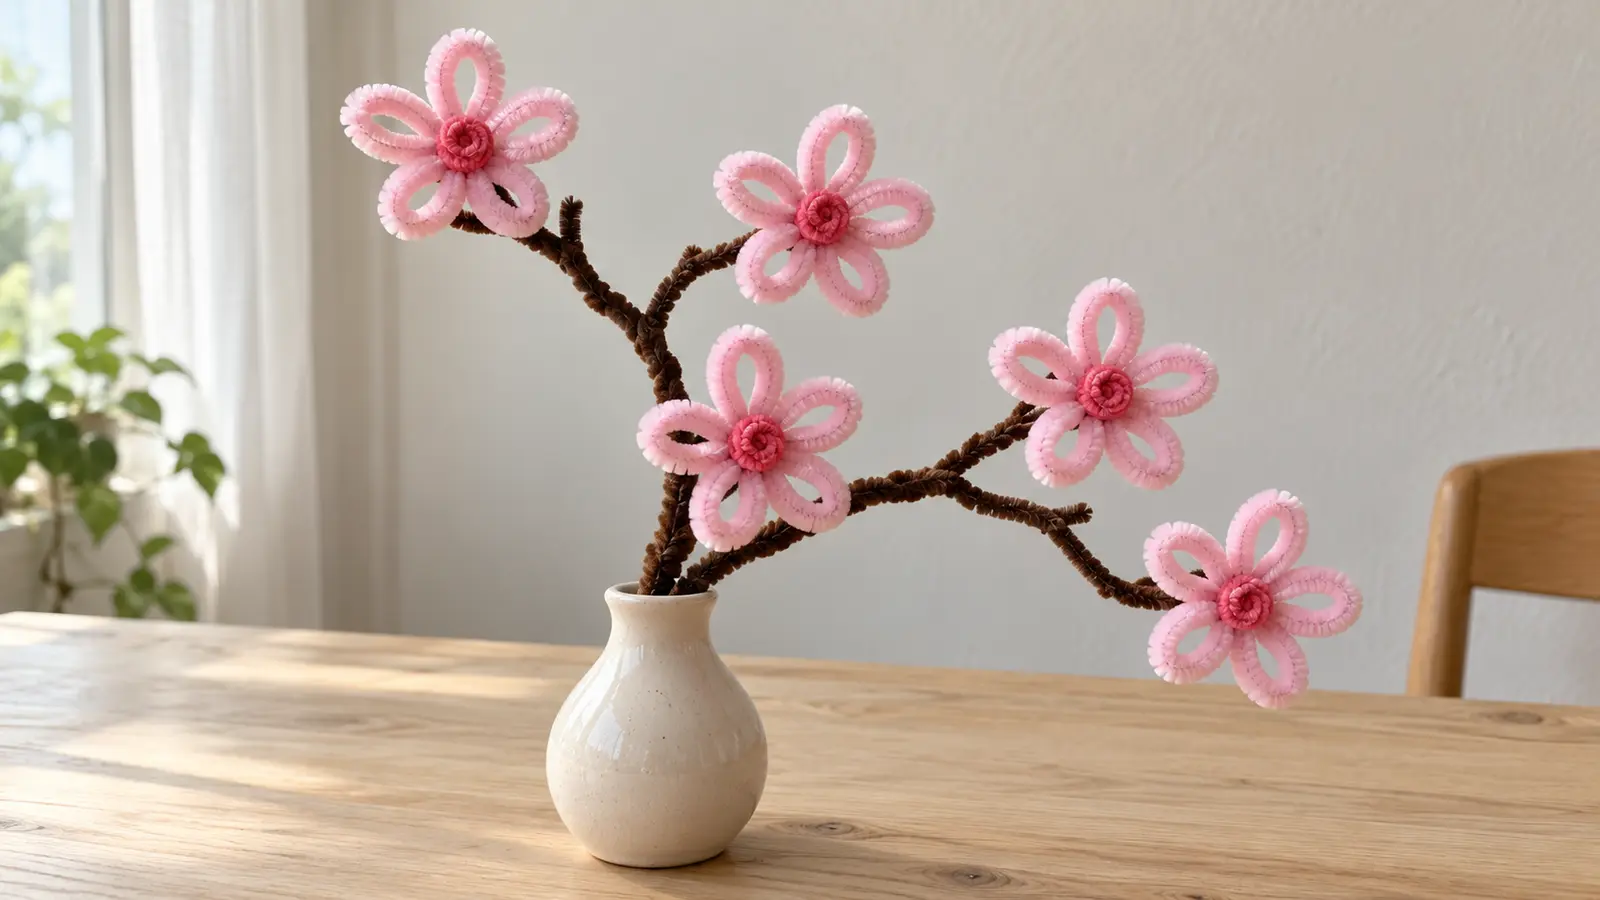
To make a pipe cleaner cherry blossom branch, shape five small pink loop-petal flowers, add a contrasting center to each, and twist their attachment tails around a reinforced brown chenille branch. The flowers and branch connect without glue. Keep the blossoms spaced apart so the forked branch remains visible.
This project makes a stylized cherry blossom spray for a small vase, shelf display or handmade gift. It is a decorative interpretation, not a botanically exact model. The open loops are intentionally visible: the fuzzy wire itself supplies the petal outline, rather than fabric, paper or beads.
If you are learning the basic joins, start with our pipe cleaner flowers without glue guide. Here, the focus is one complete branching arrangement: consistent blossom sizes, strong wire connections and a balanced silhouette.
Project Overview
- Skill level: confident beginner; an adult should help children with cutting and tight joins.
- Main techniques: rounded loops, small center coils and overlapping wire twists.
- Finished size: approximately 8–10 inches tall above the bottom of the stem, depending on your branch bends.
- Flower count: five blossoms, each roughly 1½–2 inches across.
- Time: allow about 30–45 minutes for a first branch. This is a planning estimate, not a timed test.
- Glue: none for the basic construction. Display the finished branch indoors and keep it dry.
Materials for One Five-Blossom Branch
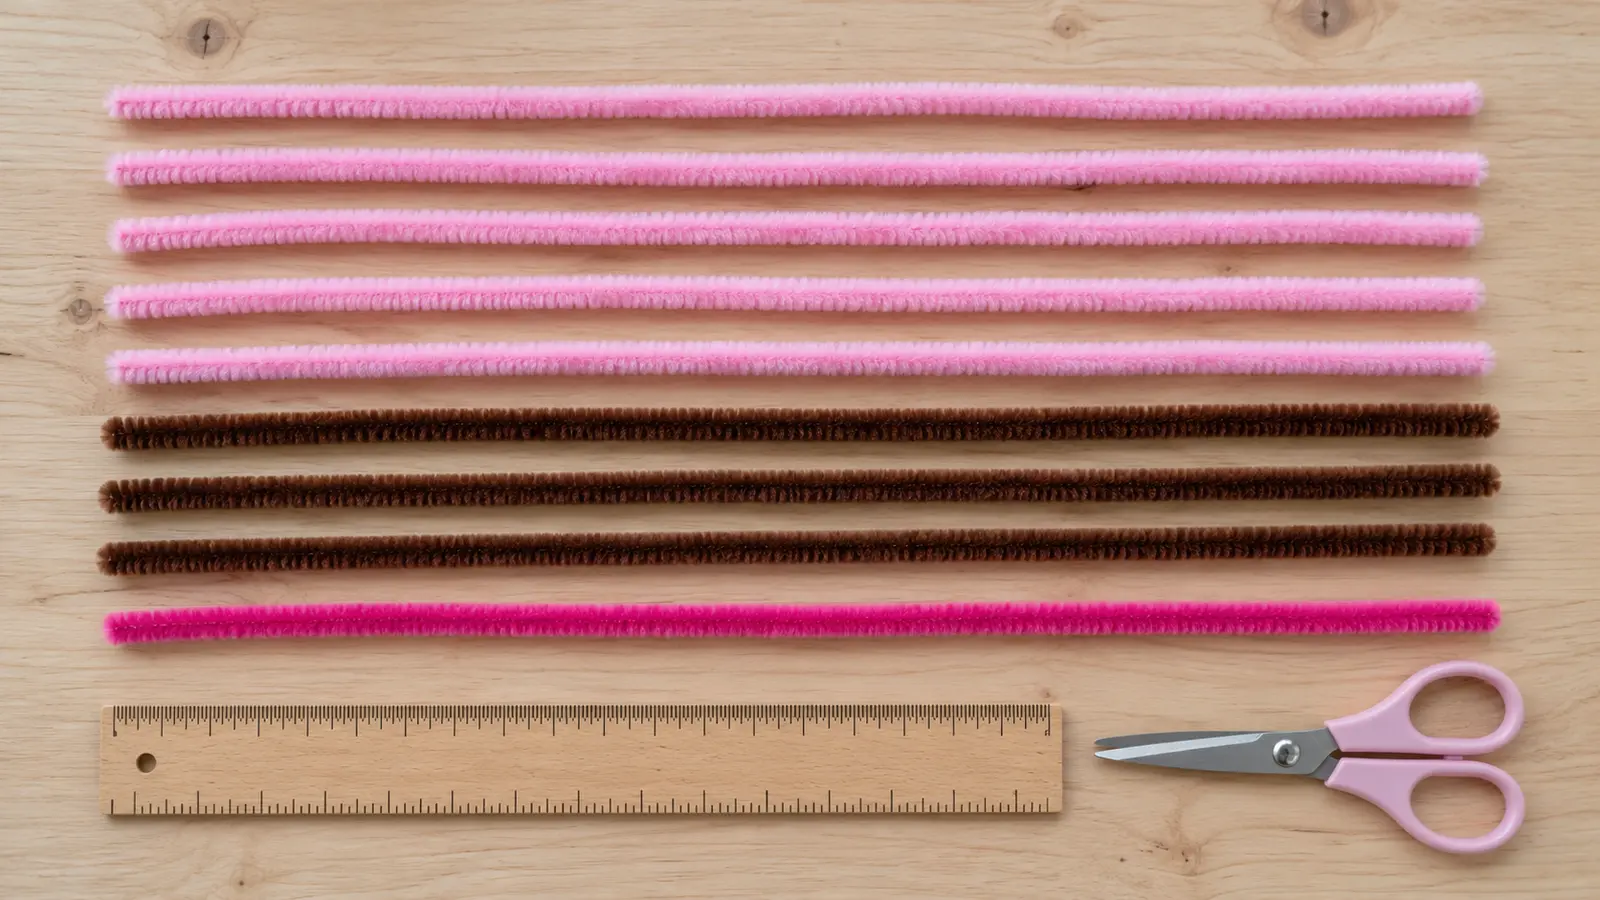
Use ordinary fuzzy craft chenille stems about 12 inches (30 cm) long and ¼ inch (6 mm) thick. Length matters more than the label on the package. Shorter stems may not provide enough wire for five petals and a locking tail, so measure before you start.
- 5 pale pink pipe cleaners, one full-length stem per blossom.
- 1 dark pink pipe cleaner, cut into five equal pieces of about 2⅜ inches (6 cm), for the centers and attachment tails.
- 3 brown pipe cleaners for the reinforced trunk and side branches.
- A ruler, suitable craft scissors or wire cutters, and optional small pliers for folding exposed tips.
- A short, stable vase for display. If needed, use a snug piece of reusable packing foam inside the vase to support the stem.
Keep one extra pink and one extra brown stem nearby for practice or reinforcement. They are spare supplies, not part of the basic nine-stem count. No leaves are required for this sparse design. Adding leaves changes the supply list; use extra green chenille stems rather than taking material away from the branch.
Scissors should be suitable for the thin internal wire. An adult should do the cutting and inspect every cut tip. Collect small offcuts immediately, keep them away from mouths and pets, and do not treat the finished branch as a toy. Avoid loose beads or tiny vase fillers around young children.
Before You Begin: Make One Practice Blossom
Complete one flower before cutting or shaping everything else. Your first blossom establishes the size of all five flowers and shows whether your particular pipe cleaners leave enough material for the joins. Thicker, densely flocked stems need more room around a twist than thin ones.
For a 30 cm stem, reserve about 3 cm at the starting end. Use approximately 4 cm of wire for each narrow rounded petal loop, plus a little wire for its pinched base. Five loops should leave a short finishing section. These are approximate shaping allowances, not a rigid cutting template.
If you run out of wire, make the loops slightly smaller instead of stretching the last petal or leaving the flower unsecured. A compact, firmly joined blossom looks more convincing than four large petals and one tiny one. Set the practice flower beside the remaining stems as a visual size guide.
How to Make a Pipe Cleaner Cherry Blossom
1. Shape the First Rounded Petal
Hold one pale pink stem about 3 cm from its end. Bend the next section outward and back to the same point, forming a narrow U-shaped loop about 2 cm long. Pinch the two sides together at the base and give the base one snug twist. Keep the reserved starting tail pointing away from the loop.
Do not coil the entire petal into a spiral. You want an open space inside the loop. Round the outer end gently with your fingertip, and keep the loop base narrower than the top. This gives each petal a softer outline than a sharply pointed leaf.
2. Add Four More Petals
Continue along the same stem, creating four more loops of roughly the same size. Bring each new loop back toward the same central area and pinch its base before moving on. Hold the completed loops together as a small fan while you work so they do not twist around each other.
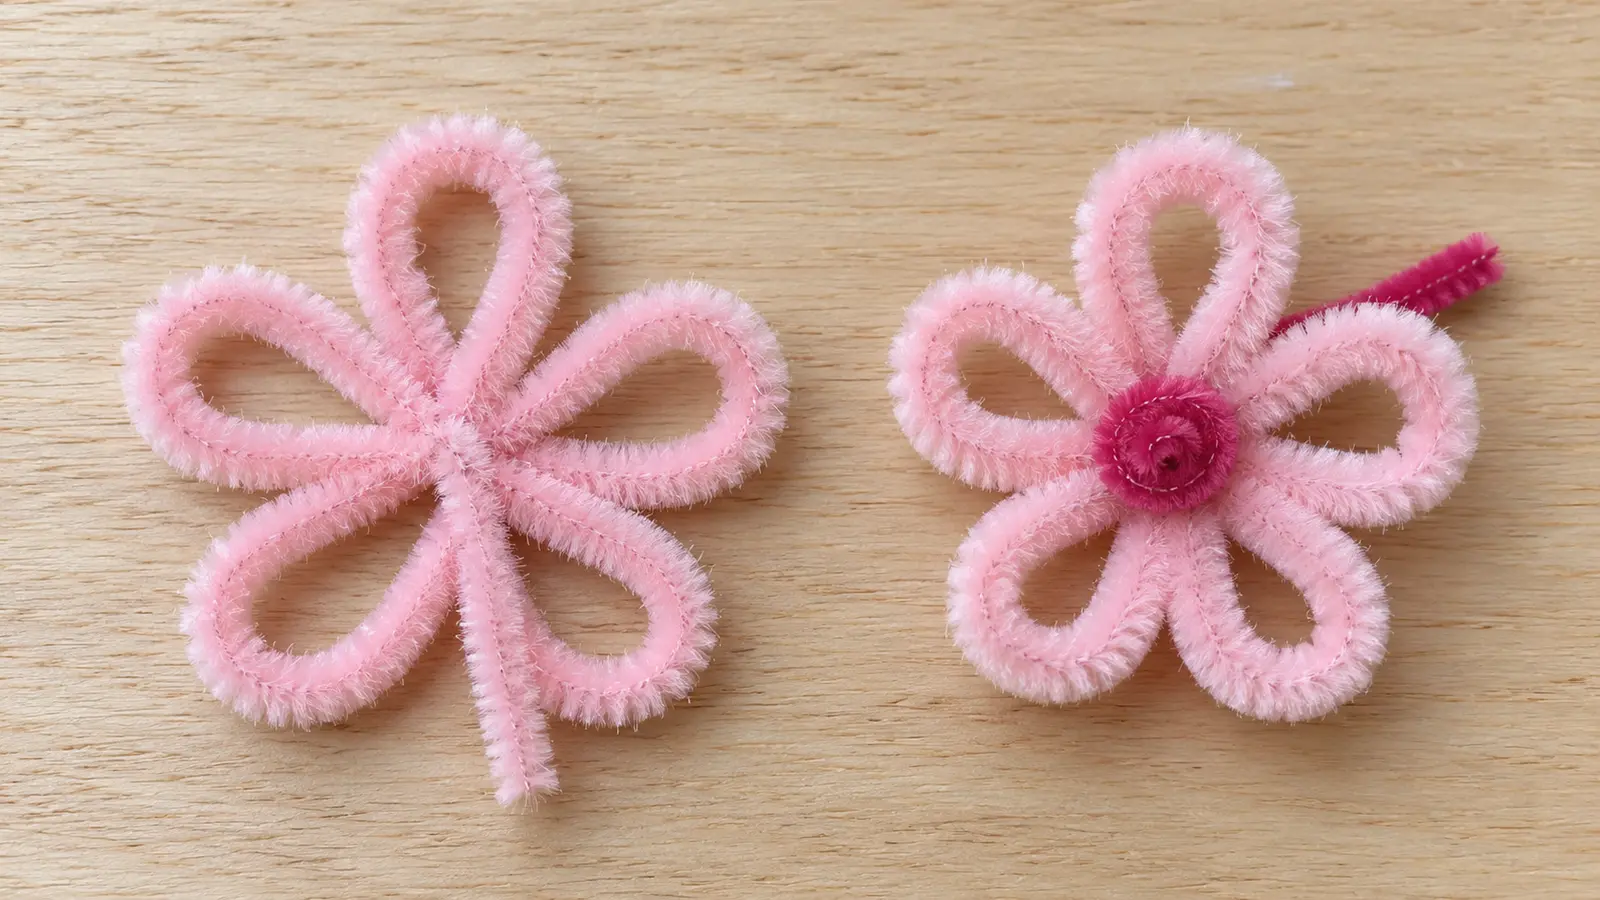
When you have five petals, curve the fan into a circle. Bring the first and last bases together, then twist the remaining pale pink ends together beneath the flower. Tuck the short finishing end inward. Keep the longer starting tail available at the back if you need it to strengthen the flower base.
Spread the five loops like a small star with rounded tips. Slight differences are fine; large gaps between two petals are usually a sign that their bases have drifted apart. Push the bases inward while supporting the back, then spread only the outer halves.
3. Make and Attach the Contrasting Center
Take one 6 cm dark pink piece. Coil roughly the first 2 cm into a tiny flat spiral. Leave the rest straight as a tail. The center should cover the gathered petal bases without hiding the open loops. If it becomes too large, unwind part of the spiral rather than adding more pressure.
Place the coil against the front of the flower. Feed the straight tail through the central gap to the back. Wrap it once around the gathered pale pink base to capture the flower, leaving the remaining length free for attachment to the branch. Give the center a gentle tug: it should stay against the petals rather than slipping through.
If the central gap is wide enough for the coil to pass through, tighten the pink petal bases first. Do not rely on fuzzy fibers alone to trap the center. The wire tail must wrap around the flower base. Keep that wrap compact so there is still enough tail to grip the branch.
4. Repeat for Five Blossoms
Make four more flowers with the same petal length and center method. Lay all five together before assembling the branch. Adjust noticeably oversized loops now, while the flowers are easy to hold individually. You can leave one flower a little smaller for a branch tip, but avoid changing both color and size on every blossom.
Check the back of every flower. Each should have a firm gathered base, a secured dark pink center and an attachment tail. Fold any unused pale pink wire end into the base. If a dark pink tail is accidentally too short, use the reserved pale pink tail as the attachment instead, or add a separate small brown tie from your spare supplies.
Build the Brown Branch
5. Reinforce the Main Stem
Lay two brown pipe cleaners side by side with their lower ends aligned. Twist them together along roughly the lower 18–20 cm, leaving the upper sections separate. The paired lower section is the trunk; the two free upper sections form the main fork. Bend them apart gently rather than making a sharp right angle.
Aim for a narrow, irregular Y shape. The two arms do not need to be mirror images. A slightly taller arm and a shorter outward bend create space for the blossoms. Fold each exposed upper tip inward to make a small rounded end. Keep the trunk mostly straight until you know how it will sit in the vase.
6. Add the Side Branch
Place the middle of the third brown stem against the trunk just below the main fork. Wind its midpoint snugly around the trunk for two turns, then spread its two ends outward as shorter side shoots. One can point upward; bend the other slightly sideways. Fold both tips inward.
Hold the bottom of the trunk and gently move each shoot. If the added stem rotates around the trunk, tighten its wrap before adding flowers. If a shoot droops under a practice blossom, shorten its reach by wrapping more of it around the trunk. That is often more effective than adding another heavy flower to balance it.
7. Plan the Flower Positions Before Twisting
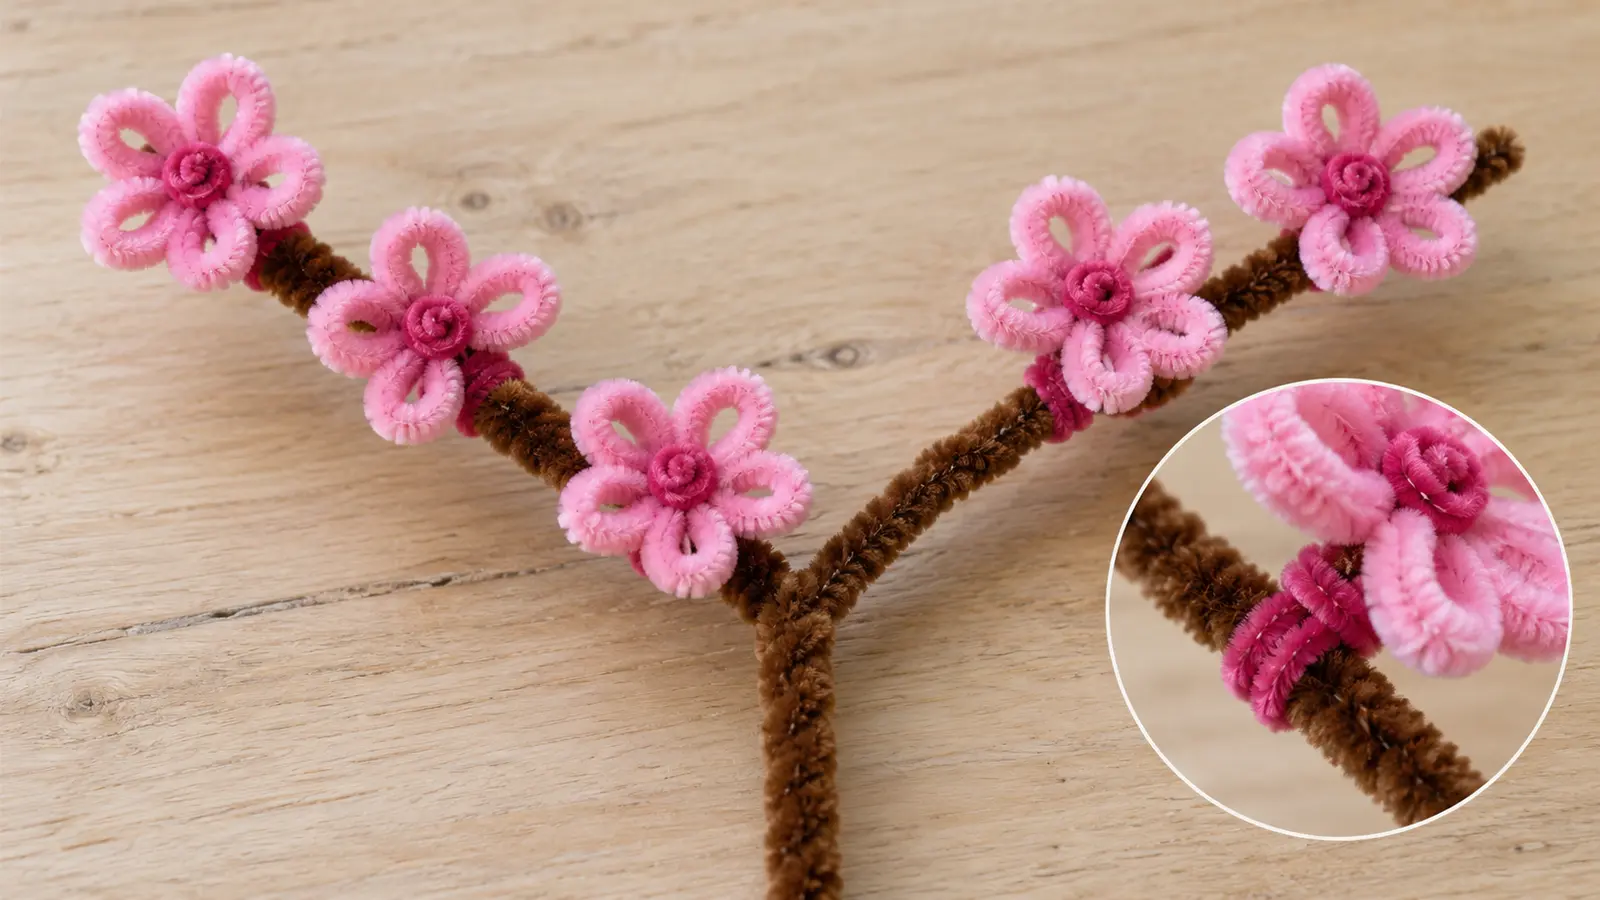
Lay the branch flat and place the five flowers beside it. Use one blossom near each of the two main fork tips, one on each side shoot, and the fifth near the upper fork. Leave some brown wire visible between flowers. Avoid placing all five heads at exactly the same height.
Viewed from the front, you should be able to see every flower center. Move a blossom a little forward or sideways if it disappears behind another. A balanced arrangement is not necessarily symmetrical; it simply keeps the visual weight close enough to the trunk that the vase is stable.
8. Attach the Blossoms Without Glue
Hold the first flower against a branch with its face pointing outward. Wrap its dark pink attachment tail twice around the brown wire immediately behind the flower. Pinch the wrap snugly, then tuck the final tip into the brown fibers with your fingertips or pliers. Do not squeeze the front coil while tightening the back.
Attach the other four flowers in the same way, working from the upper tips toward the fork. Support the branch behind each join so you do not distort the trunk. If the flower spins, rewrap the tail more tightly or use its reserved pale pink tail for a second mechanical connection.
A secure flower can still be angled slightly by bending the short branch section behind it. Make that adjustment once or twice, gently. Repeatedly bending the same tiny wire joint back and forth can weaken it. If a connection has become damaged, replace that piece rather than hiding it under more fluff.
9. Shape, Inspect and Display
Lift the branch upright and inspect it from the front and side. Round any flattened petals and tilt a few blossoms slightly upward. Keep the flower heads mostly in a shallow front-facing arrangement so they are visible in a small shelf display, but do not force every petal into one perfectly flat plane.
Place the trunk into a dry, stable vase. A snug foam insert can hold the bottom without adding water. Use a shorter branch or a wider-based vase if the arrangement leans. Never depend on a narrow, lightweight container to support a long sideways branch. Check stability on the actual surface where it will be displayed.
For a different handmade container, see our woven pipe cleaner vase tutorial. A lightweight chenille vase still needs an appropriate stable support inside when holding a top-heavy branch.
Common Problems and Simple Fixes
The Flower Looks Like a Daisy
Shorten and round the pink loops, keep the center small, and choose a pale pink or white palette. Long narrow petals around a large contrasting disk create more of a daisy effect. This design remains a stylized loop flower; the brown branching structure is part of what makes the cherry blossom interpretation recognizable.
The Petals Unwind or Separate
Check the bases rather than squeezing the petal tips. The first and last ends must be twisted together under the flower, and the center tail must capture that same base. Untwist carefully, gather the bases closer and reconnect. A loose center coil cannot substitute for a proper wire join.
The Flowers Slide Down the Branch
The attachment wrap is probably too loose or too long. Unwrap it and make two compact turns immediately behind the blossom. Position the join beside a fork or existing branch wrap if you need additional resistance. If necessary, add a short brown tie from a spare stem and fold its ends inward.
The Branch Feels Too Heavy
Reduce the spread before adding more stems. Bring side shoots closer to the trunk, lower the widest flower and shorten unsupported sections. If it still bends, reinforce the trunk with your spare brown stem. Check the vase again after reinforcement because a stronger branch can still tip a small container.
Color and Display Variations
For a soft pink version, use pale pink petals and a medium pink center. For white blossoms, keep a tiny pink center so the flower bases remain visible. For a more graphic craft, choose hot pink petals against dark brown branches, while keeping the construction unchanged.
A two-blossom mini spray can use fewer flowers on a shorter fork, but build and check its joins exactly as you would on the full branch. For a fuller display, make a second separate branch and arrange the two together. Do not keep loading one thin branch with flowers until it droops.
If you want to mix these blossoms with other shapes, compare the different types of pipe cleaner flowers. Keep this branch as the airy element rather than crowding it into the middle of a dense bouquet.
Compact Instructions to Print
Use this short checklist beside your materials. Print the relevant part of this page with your browser print controls; this section is on-page text, not a separate downloadable PDF.
- Set out five pale pink stems, one dark pink stem cut into five 6 cm pieces, and three brown stems.
- Form five rounded loops from each pale pink stem; gather and twist the bases together.
- Coil a tiny dark pink center, pass its tail through the flower and wrap the base once.
- Twist two brown stems together along the lower 18–20 cm; open the top ends into a fork.
- Wrap the midpoint of the third brown stem around the trunk to create side shoots.
- Plan five spaced flower positions, keeping the brown branch visible.
- Wrap each flower tail snugly around its branch twice; tuck all tips inward.
- Shape gently, check every join and place in a stable dry vase.
For a downloadable collection of other flower projects, visit our pipe cleaner flowers printable instructions hub. This cherry blossom branch is a separate tutorial; it is not presented as an additional sheet inside that existing booklet.
FAQS
How many pipe cleaners do I need for one cherry blossom branch?
The five-blossom version uses nine 30 cm stems: five pale pink, one dark pink divided into five center pieces, and three brown. Keep extra stems for practice or reinforcement. A vase and tools are additional.
Can I make pipe cleaner cherry blossoms without hot glue?
Yes. Twist the petal bases together, wrap the center tail around the flower base, then use the remaining tail to secure the blossom to the branch. Check that the wire connections are snug.
How many petals should each blossom have?
This stylized design uses five rounded loop petals. Make the loops similar in size and gather their bases closely before attaching the center.
Can children make this project?
Children who can manage small loops may participate with adult supervision. An adult should cut stems, help with tight connections and inspect exposed wire ends. Finished branches are decorations, not toys for babies or toddlers.
Is there a cherry blossom PDF download on this page?
This page provides a compact on-page checklist you can print with your browser. It does not include a separate cherry blossom PDF download.
Should I put water in the vase?
No. Keep the chenille branch dry. Use a stable vase with a snug dry support if needed, and keep the finished display away from moisture.
Your Final Branch Check
Before putting the tools away, turn the branch around and inspect the back. Every blossom should remain attached when lightly touched, the branch junctions should resist rotation, and no wire point should scratch your fingers. Make final adjustments at the branch bends rather than pulling on the petals.
The finished effect comes from repetition and space: five simple blossoms, a visible brown structure and a few gentle changes in direction. Once the joins are secure, stop adding details and let that clear shape be the decoration.
1 thought on “How to Make a Pipe Cleaner Cherry Blossom Branch”