Most wall decorations cost a fortune or look exactly like everyone else’s. A pipe cleaner wall hanging costs under $5, takes 30 minutes, and looks like something you’d find in a boutique decor shop.
No glue gun. No special tools. Just pipe cleaners, a wooden dowel or branch, and a little patience.
This guide covers everything: how to make a pipe cleaner wall hanging step by step, 10 design ideas sorted by style, the best flowers to use, and how to hang it properly so it stays straight on your wall forever.
💡 New to pipe cleaner flowers? Start with our simple pipe cleaner flower ideas for beginners first, then come back here to assemble your wall hanging.
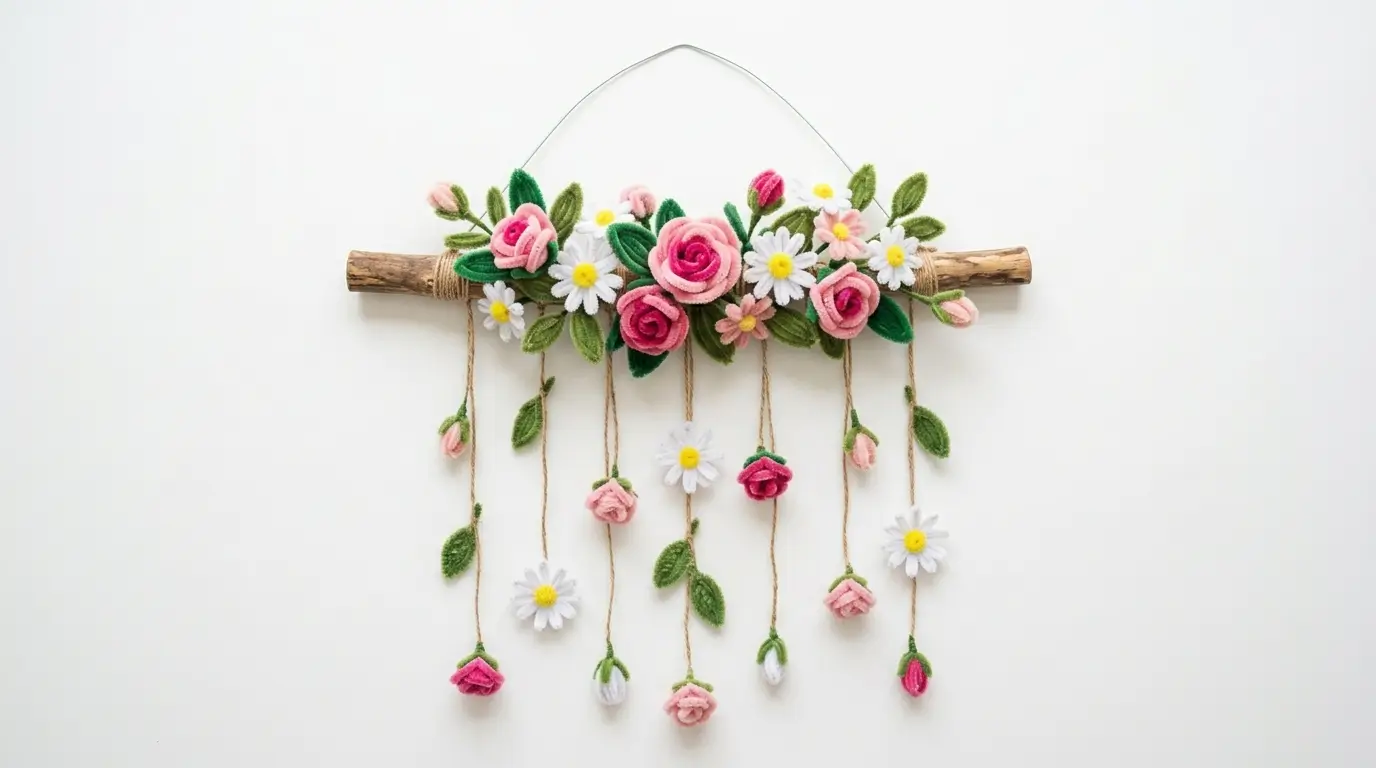
What Is a Pipe Cleaner Wall Hanging?
A pipe cleaner wall hanging is a decorative piece made by attaching pipe cleaner flowers, leaves, and shapes to a horizontal rod — usually a wooden dowel, a twig, or a piece of driftwood — then hanging it on the wall with a piece of string or twine.
The result looks like a handmade macramé wall hanging, but far easier to make and fully customizable in any color or flower style.
It works in every room: bedroom, living room, kids’ room, classroom, or hallway.
What You Need
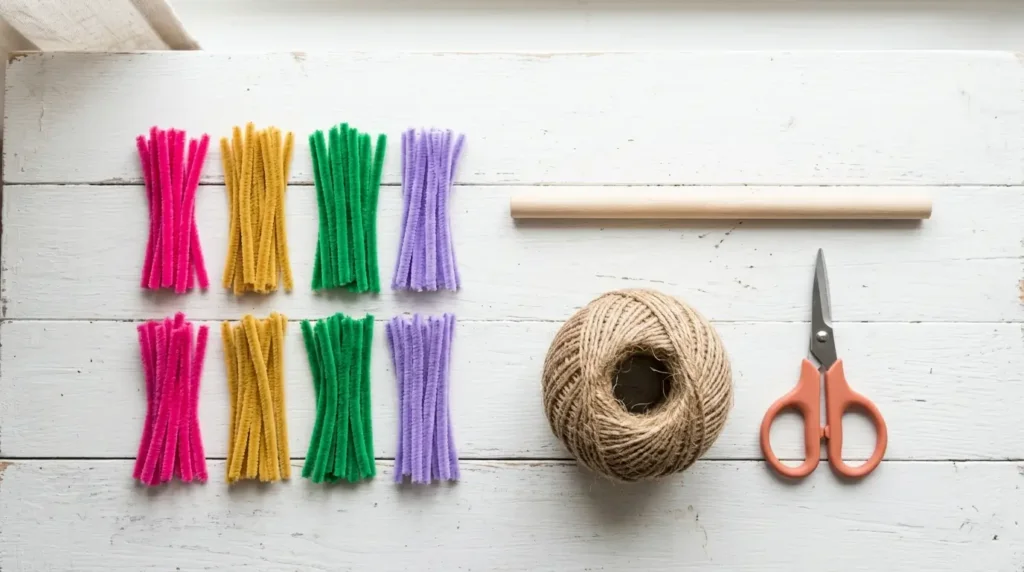
- Pipe cleaners in your chosen colors — 1 pack of 50 is enough for a medium hanging
- Green pipe cleaners — for stems and leaves
- A wooden dowel, thick twig, or driftwood piece — 25 to 40 cm wide
- Twine or string — for hanging
- Scissors — only for cutting string, not required for the flowers
Total cost: $2–5 · Time: 30–45 minutes
How to Make a Pipe Cleaner Wall Hanging – Step by Step
Step 1 — Choose your rod
Pick a wooden dowel from a craft store (25–40 cm), or go outside and find a straight branch or piece of driftwood. The natural look of a real branch gives your wall hanging a boho, handmade feel that no store-bought dowel can match.
Sand any rough edges lightly with fine sandpaper before attaching anything.
Step 2 — Make your flowers
Make your pipe cleaner flowers before assembling the hanging. This lets you lay them all out and plan the arrangement before committing.
For a standard wall hanging, make:
- 3 to 5 larger flowers (roses, sunflowers, or daisies) as focal points
- 4 to 6 medium flowers (tulips or small daisies) as fillers
- Several leaves and small buds to fill gaps
Full tutorials for each flower:
- Pipe cleaner rose — the most elegant focal flower
- Pipe cleaner daisy flower — light and airy filler
- Pipe cleaner sunflower — bold statement flower
- Pipe cleaner tulip — perfect for spring-style hangings
- Lavender pipe cleaner flowers — ideal vertical filler
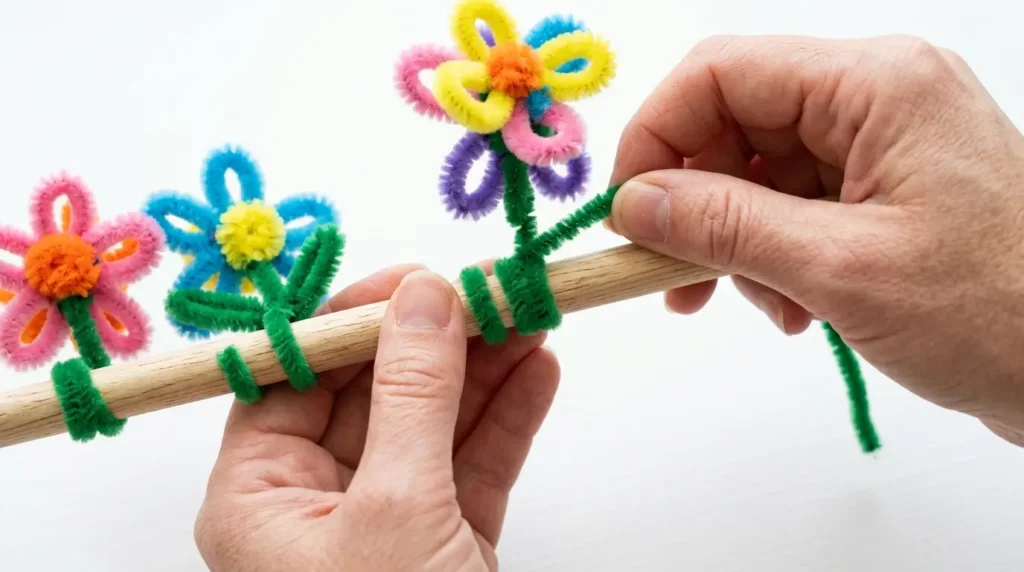
Step 3 — Make the hanging strings
Cut 5 to 7 pieces of green pipe cleaner or twine, each 15 to 25 cm long. These are the vertical strings from which your flowers will hang. Varying the lengths creates a cascading, layered effect — this is the single most important detail for making your wall hanging look professional.
Attach each string to the dowel by folding 2 cm over the top of the rod and twisting tightly 3 times. Space them evenly across the full width.
Step 4 — Attach the flowers
Twist the stem of each flower around its hanging string, starting from the bottom and working upward. Place your largest flowers first, then fill in with smaller ones and leaves.
Key rule: odd numbers always look better. 5 or 7 flowers per row looks more natural than 4 or 6.
Leave some strings without flowers at the bottom — bare twine or pipe cleaner strings at different lengths give your hanging a relaxed, organic feel.
Step 5 — Add leaves and buds
Fold small pieces of green pipe cleaner into pointed oval leaf shapes and twist them onto the strings between the flowers. Leaves fill gaps, add depth, and make the whole piece look lush and finished rather than sparse.
Add small spiral buds by wrapping a short pipe cleaner around a pencil and sliding it off — these tiny spirals between flowers add texture without bulk.
Step 6 — Hang it
Cut a piece of twine 30–40 cm long. Tie each end tightly to the far left and far right of the dowel. Hang on a single nail or hook.
For a perfectly straight hang: hold the twine loop at its midpoint and let the hanging dangle freely for 30 seconds before placing on the wall. This balances the weight naturally.
10 Pipe Cleaner Wall Hanging Ideas
🌸 Idea 1 — Spring Garden Wall Hanging
Pink roses + white daisies + green leaves on a natural twig. The most classic and universally loved design. Works in any bedroom or living room.
🌻 Idea 2 — Boho Sunflower Hanging
Yellow sunflowers + orange tulips + brown and cream twine strings. Display in a kitchen or hallway for a farmhouse-chic effect. See our full pipe cleaner sunflower guide for the exact flower tutorial.
💜 Idea 3 — Lavender Dream
All lavender pipe cleaner flowers, 7 sprigs at cascading heights, on a thin white dowel. Minimal, elegant, and calming. Perfect for a bedroom above the headboard. Full tutorial in our lavender pipe cleaner flowers guide.
🌹 Idea 4 — Valentine’s Day Wall Hanging
Red and pink roses only, monobouquet style, on a dark-stained wooden dowel with a red ribbon bow at the top. A romantic alternative to cut flowers that lasts all year.
🎄 Idea 5 — Christmas Wall Hanging
Red and white flowers + green leaf sprigs + a small star shape at the top made from gold pipe cleaners. The perfect holiday decoration that costs less than $3 to make. More Christmas ideas in our pipe cleaner flowers Christmas guide.
🌿 Idea 6 — Minimalist Greenery Hanging
Green pipe cleaners only — leaves, ferns, and spiral buds in every shade of green. No flowers at all. Strikingly modern and works with any interior color palette.
👰 Idea 7 — Wedding Wall Hanging
All-white roses and daisies on a driftwood rod, with white and ivory twine strings of varying lengths. Use 3–4 identical hangings as a backdrop behind a wedding table or ceremony arch. Full wedding decoration ideas in our pipe cleaner wedding flowers guide.
🏫 Idea 8 — Classroom Wall Hanging
Each student makes 1–2 flowers. Combine all flowers onto one long dowel to create a collaborative class artwork. Every child’s contribution is visible — a beautiful end-of-year project. More classroom craft ideas in our pipe cleaner flowers classroom decoration guide.
🌈 Idea 9 — Rainbow Children’s Room Hanging
One flower in each color of the rainbow, arranged in order from left to right on the dowel. Bright, cheerful, and endlessly engaging for young children. Pairs perfectly with the ideas in our bedroom decor pipe cleaner flowers guide.
🌺 Idea 10 — Flower Crown Wall Hanging
Arrange flowers in a curved arc shape on the dowel rather than in straight rows — mimicking the shape of a flower crown. Creates a stunning statement piece above a sofa or bed. See also our pipe cleaner flower crown guide for the standalone wearable version.
Where to Display Your Pipe Cleaner Wall Hanging
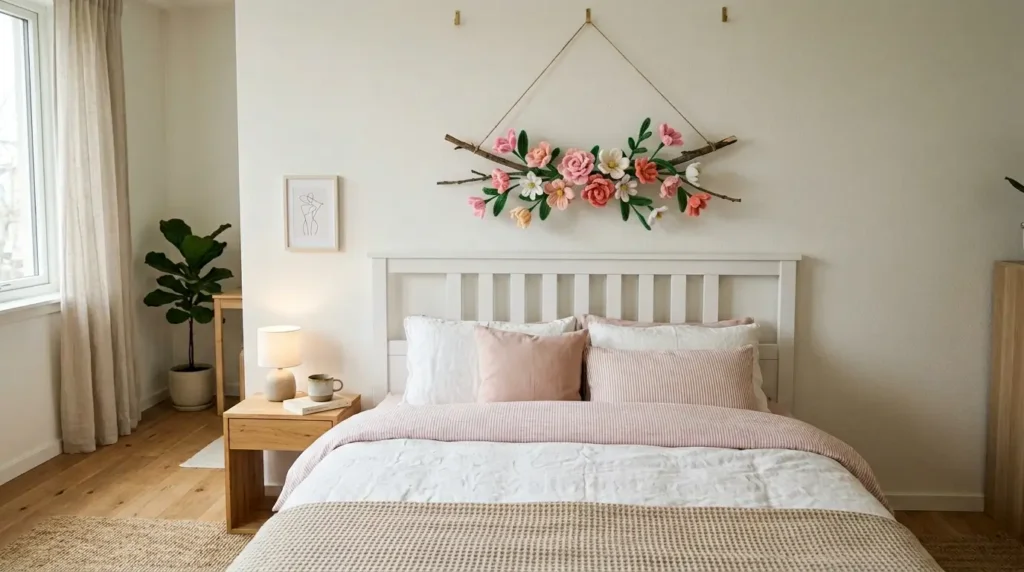
Above the bed — the most impactful placement. A 35–40 cm wide hanging centered above a headboard transforms the entire room.
On a gallery wall — mix with framed photos and prints. The three-dimensional texture of pipe cleaner flowers stands out beautifully against flat artwork.
In a child’s bedroom — at child height on a lower section of wall. Children love reaching up and touching the flowers.
In a classroom — hung above the whiteboard or along a bulletin board strip. See our full pipe cleaner flowers classroom decoration guide for more ideas.
In a hallway — a narrow wall hanging in a hallway makes an immediate impression on anyone entering the home.
Pro Tips for a Wall Hanging That Looks Store-Bought
Vary your string lengths — minimum 3 different lengths per hanging. Uniform lengths look flat.
Use at least 3 flower types — a mix of hero flowers, medium flowers, and filler sprigs always looks better than one type alone.
Add leaves everywhere — between every flower, not just at the bottom. Leaves are what separate a craft project from real decor.
Choose a color palette of 2–3 colors maximum — more than 3 colors looks chaotic rather than colorful.
Face all flowers slightly downward — tilt each flower head 15–20 degrees forward so the face is visible from below, not just from straight ahead.
🌸 Frequently Asked Questions
Final Thoughts
A pipe cleaner wall hanging is proof that the most beautiful home decor doesn’t need to cost much or take long. Thirty minutes, a handful of pipe cleaners, and a stick from the garden — that’s all it takes to make something genuinely beautiful for your wall.
Start with Idea 1 (the spring garden hanging) if you’re not sure where to begin. Once you’ve made your first one, you won’t stop at one.
Happy crafting — from My Flower Decor! 🌸
Save to Pinterest and inspire someone else to start crafting! 📌
More guides you’ll love: