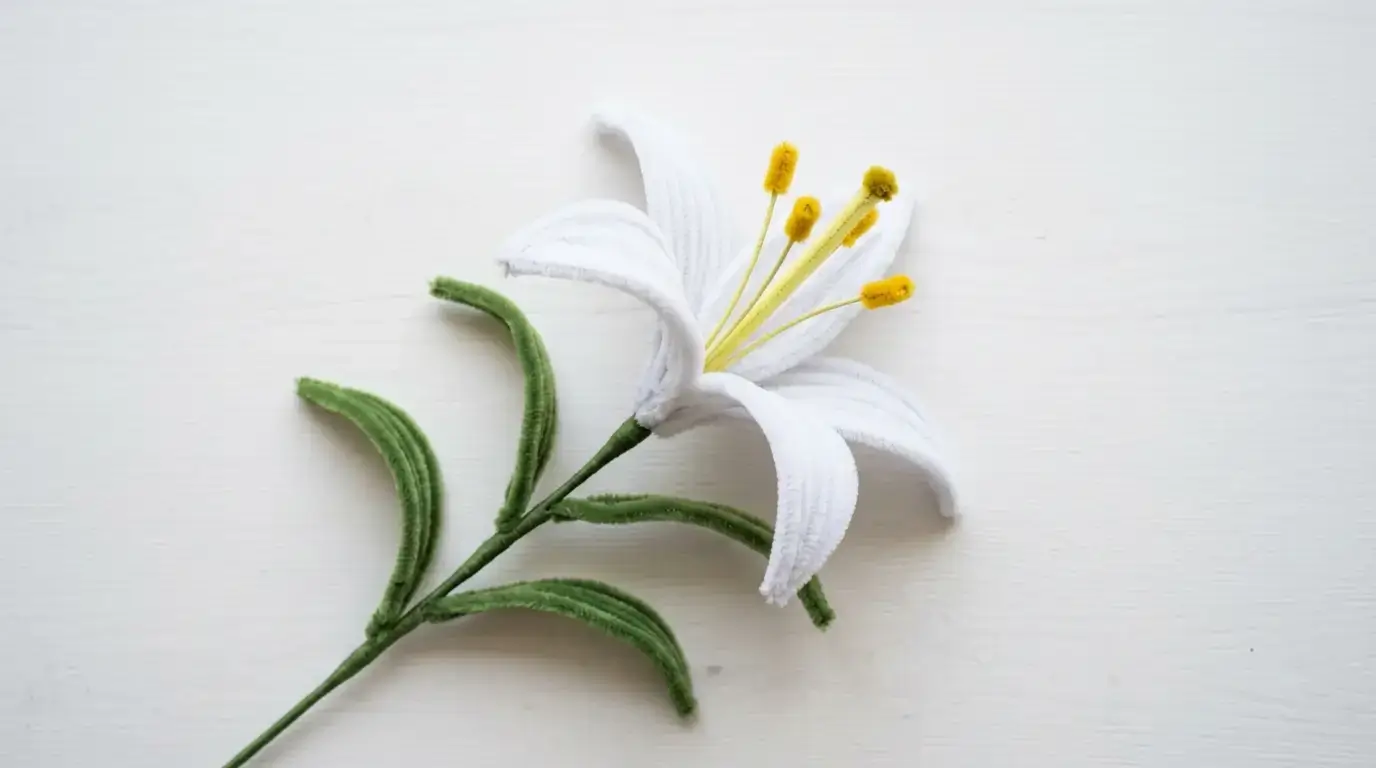
The lily is one of the most elegant flowers you can make with pipe cleaners — and one of the most underrated. While roses and daisies get all the attention, a well-made pipe cleaner lily stops people in their tracks.
Six petals, one center, one stem. No glue. No scissors. Just pipe cleaners and 10 minutes.
This guide covers how to make a classic pipe cleaner lily step by step, 7 variations from beginner to intermediate, and exactly how to use your lily in bouquets, crowns and home decor.
💡 New to pipe cleaner crafts? Start with our simple pipe cleaner flower ideas for beginners before tackling the lily — it shares the same petal-loop technique.
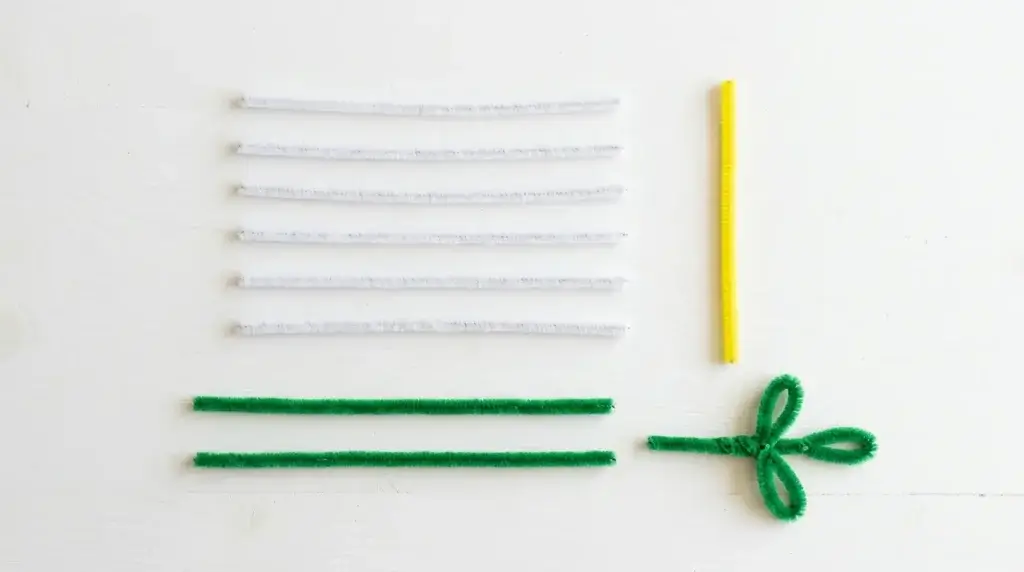
What You Need
- 6 colored pipe cleaners (petals) — any color, cut into 10 cm pieces each
- 1 yellow or white pipe cleaner (center stamens)
- 2 green pipe cleaners (double stem)
- 1 green pipe cleaner (leaves)
- Optional: 1 contrasting pipe cleaner for petal edge detail
Total cost: under $1 · Time: 8–10 minutes · Age: 7+
How to Make a Pipe Cleaner Lily – Step by Step
Step 1 — Make the petals
Cut your colored pipe cleaner into 6 equal pieces of approximately 10 cm each.
Take one piece and fold it in half to form a narrow pointed oval — pinch the two ends together at the base and twist once to lock. This is one petal. The shape should be elongated and slightly pointed at the tip, not round like a daisy petal.
Repeat for all 6 petals. The more uniform your petal length, the more elegant the finished lily.
Step 2 — Make the stamens
Take your yellow pipe cleaner and fold it in thirds — creating three equal sections. Fold the whole thing in half so you have six short upright prongs. Twist the base tightly 3 times to hold the bundle together.
These six prongs are the stamens — the distinctive feature that makes a lily look like a lily.
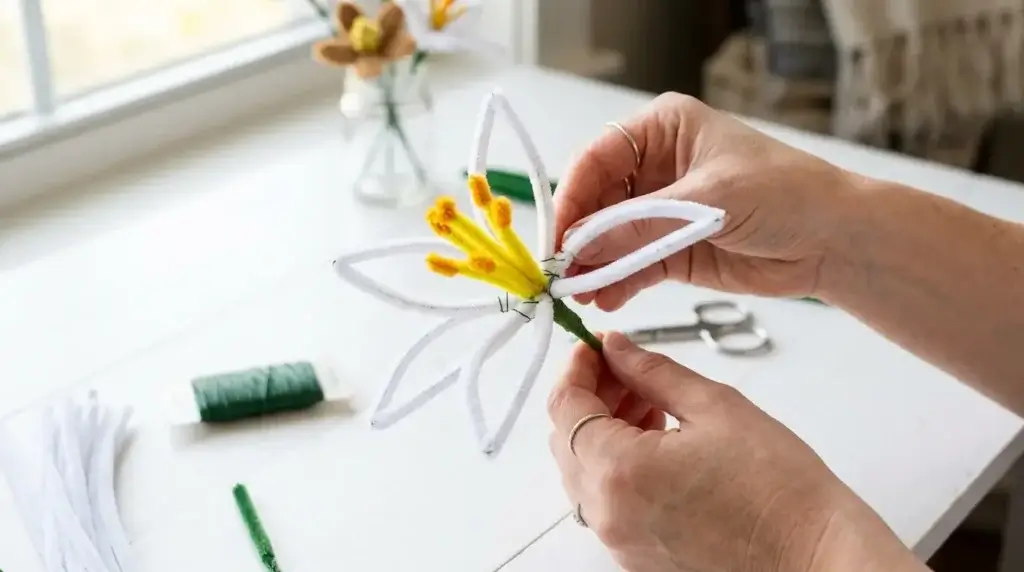
Step 3 — Attach petals to stamens
Hold the stamen bundle upright. Press the base of the first petal against the stamen base and wrap its twisted tail around the stamen base once. Repeat for all 6 petals, spacing them evenly around the stamens.
Once all 6 petals are attached, twist all tails together firmly at the base — 4 full rotations. This locks the entire flower head in place.
Step 4 — Open and shape the petals
Gently spread the 6 petals outward and slightly backward — lily petals curve back away from the stamens, not forward like a tulip. This backward curl is what gives the lily its characteristic open, dramatic look.
Curl the tip of each petal very slightly backward by pressing it gently against your fingertip. Do not flatten — keep each petal three-dimensional.
Step 5 — Make the double stem
Twist two green pipe cleaners together end-to-end to create one long firm stem. Attach to the flower base by wrapping around the petal twist point 3 times firmly.
Step 6 — Add leaves
Fold a green pipe cleaner into a long narrow pointed oval — lily leaves are longer and more pointed than rose or daisy leaves. Attach one leaf halfway down the stem and one leaf two-thirds of the way down, on opposite sides. Wrap each leaf base around the stem 3 times.
Your lily is complete.
7 Pipe Cleaner Lily Variations
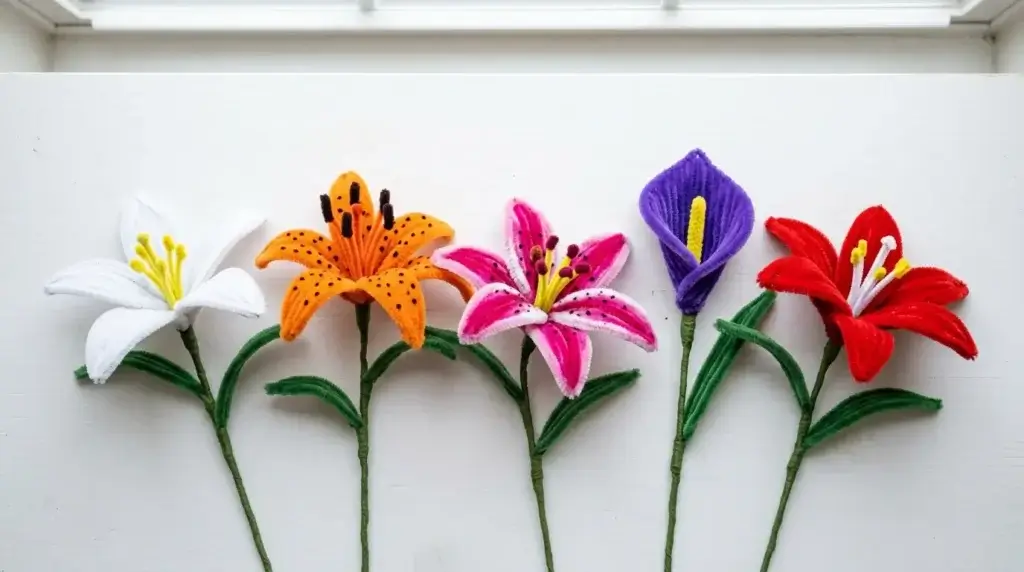
🌸 Variation 1 — Classic White Lily
White petals with yellow stamens and green stem. The most elegant and versatile lily — works in any arrangement, any room, any occasion.
Best for: home decor, wedding arrangements, sympathy gifts. Full wedding ideas in our pipe cleaner wedding flowers guide.
🟠 Variation 2 — Tiger Lily
Orange petals with dark brown or black stamens. Add tiny black dot details by twisting small black pipe cleaner pieces into each petal near the base — this mimics the characteristic tiger lily spots.
Best for: autumn arrangements, bold home decor, mixed bouquets with sunflowers. Full sunflower tutorial in our pipe cleaner sunflower guide.
💗 Variation 3 — Pink Stargazer Lily
Deep pink petals with white edges and dark stamens. To create the white edge effect, wrap a thin strip of white pipe cleaner along the outer edge of each petal before shaping. Striking and realistic.
Best for: Mother’s Day bouquets, birthday gifts, flower crowns. Full crown tutorial in our pipe cleaner flower crown guide.
💜 Variation 4 — Purple Calla Lily
This variation uses a different technique — one large petal rolled into a cone shape rather than six separate petals. Roll a full-length purple pipe cleaner into a funnel, twist the base to hold the cone, and insert a single yellow stamen into the center.
Best for: elegant home decor, minimalist bouquets, advanced crafters
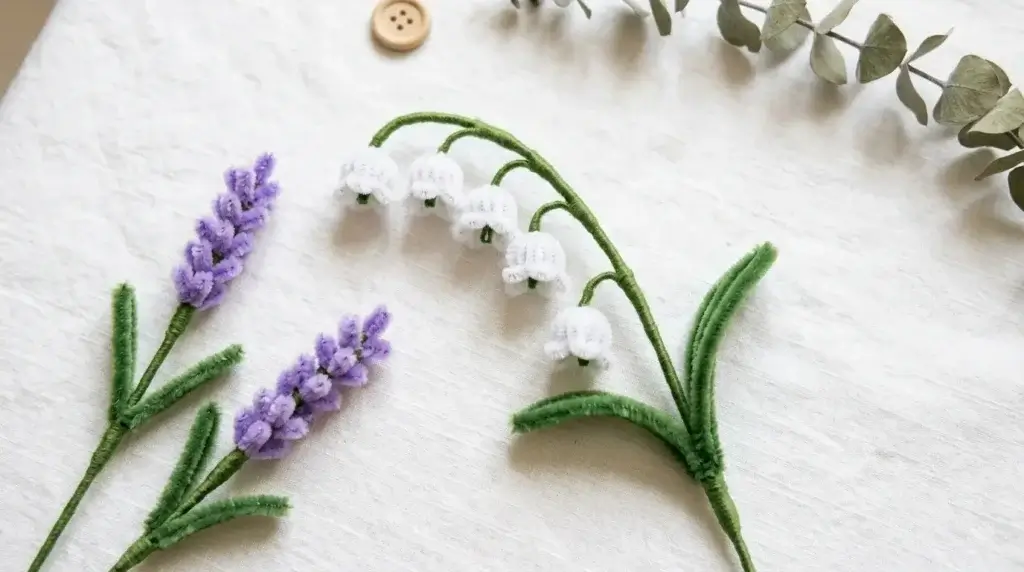
⚪ Variation 5 — Lily of the Valley
Miniature version — make petals only 4 cm long, use only 4 petals per flower, and make 4–6 tiny flowers per stem attached at intervals along one long green pipe cleaner. Creates a cascading spray effect.
Best for: wedding bouquets, flower crowns, delicate arrangements. Pairs naturally with our lavender pipe cleaner flowers.
🔴 Variation 6 — Red Christmas Lily
Deep red petals with gold stamens. Combine with white lilies and green leaves for a classic Christmas arrangement. More holiday ideas in our pipe cleaner flowers Christmas guide.
Best for: Christmas table decor, holiday wreaths, festive gift wrapping
🌿 Variation 7 — Two-Tone Ombre Lily
Use two different shades of the same color — pale pink outer petals and deep pink inner petals, alternating around the center. Three pale + three deep, alternating. Creates a stunning depth effect with no extra materials.
Best for: display pieces, statement bouquets, advanced crafters
How to Use Pipe Cleaner Lilies in Arrangements
In a bouquet: Lilies are hero flowers — place one or two lilies at the center back of your bouquet as the tallest focal point, then build shorter flowers around them. Full bouquet assembly in our pipe cleaner flower bouquet ideas guide.
In a flower crown: Attach lily stems to the crown base at the 12 o’clock position as the centerpiece, then surround with smaller flowers. The lily’s open face sits naturally at the top of the crown. Full tutorial in our pipe cleaner flower crown guide.
In a wall hanging: Place one large lily at the center of your hanging as the statement piece. Surround with smaller daisies and lavender sprigs. Full guide in our pipe cleaner wall hanging tutorial.
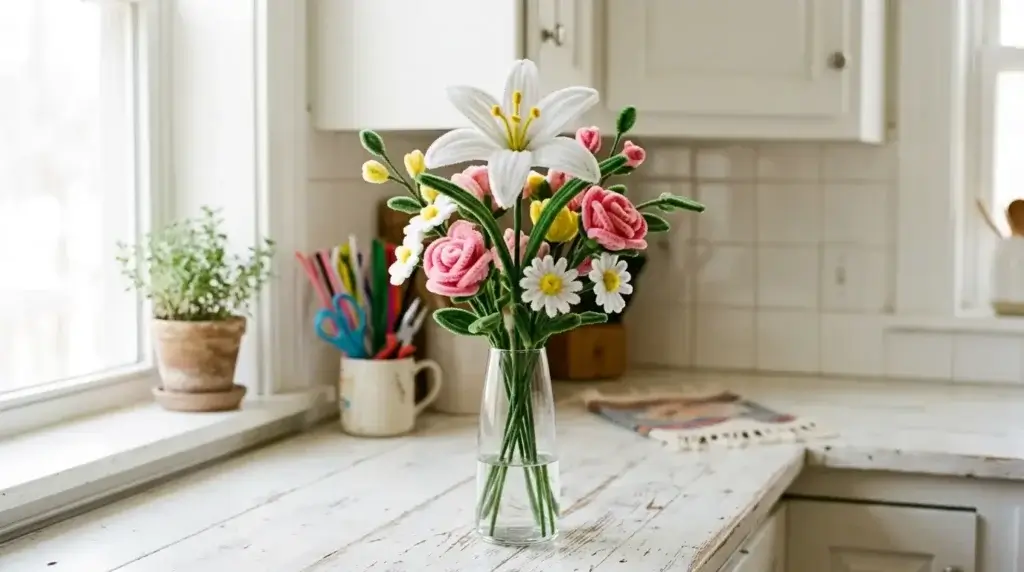
As a standalone stem: A single pipe cleaner lily in a slim bud vase is one of the most elegant pipe cleaner displays possible. One flower, one stem, one vase. No arrangement needed.
Pro Tips for a Lily That Looks Florist-Made
Six petals exactly — not five, not seven. Real lilies have six petals. This single detail is what makes a pipe cleaner lily look unmistakably like a lily rather than a generic flower.
Backward curl is everything — without the backward petal curl, your lily looks like a daisy. Spend 30 extra seconds curling each petal tip backward after assembly.
Make stamens visible — the stamens should stand clearly above the petal level. If they’re buried inside the petals, gently push them upward through the petal arrangement after assembly.
Long leaves only — lily leaves are long and narrow. If your leaves are short and round they look wrong. Use a full pipe cleaner per leaf and keep the shape elongated.
Vary stem height in arrangements — a lily stem should always be the tallest in any arrangement. If your lily stem is the same height as your roses it loses visual impact.
Pipe Cleaner Lily as a Classroom Project
The lily is the ideal progression flower for students who have already mastered the daisy or wildflower. It uses the same loop technique but requires more precision in petal shaping and stamen construction.
Ages 7–9: Make the classic white lily following steps 1–6 with adult guidance on stamen construction.
Ages 10–12: Full independent construction. Challenge them to add the tiger lily spot detail.
Ages 13+: Attempt the ombre two-tone variation or the calla lily cone technique.
For a complete classroom flower project combining lilies with other flowers, see our pipe cleaner flowers classroom decoration guide.
Frequently Asked Questions
Final Thoughts
The pipe cleaner lily is proof that simplicity and elegance are not opposites. Six pointed petals, six visible stamens, one firm double stem — and the result looks like something from a flower shop.
Start with Variation 1 (the classic white lily). Once you have the petal shape and backward curl right, every other variation is just a color change.
Happy crafting — from My Flower Decor! 🌸
Save to Pinterest and share the lily love! 📌
More guides you’ll love:
- Free pipe cleaner flowers printable instructions PDF — download and print all 10 flower tutorials for free
- Pipe cleaner rose – step-by-step guide
- Pipe cleaner tulip – easy tutorial
- Pipe cleaner flower bouquet ideas
- Lavender pipe cleaner flowers
- Types of pipe cleaner flowers
- Pipe cleaner flowers printable instructions